As a Chinese open source real-time operating system, RTT has been enriched by some domestic professionals and now supports most MCUs and X86
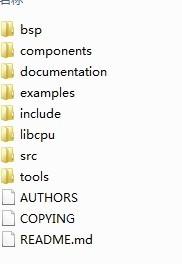
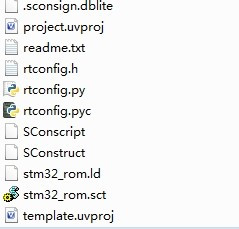
 The bsp contains the project templates that can support the chip; there is a stm32f40x directory in it, copy it out, in order not to damage the original file; I mentioned before that RT_Thread relies on scons to compile or build a keil project, which is somewhat similar to the Linux Makefile. There are several important files in this directory:
 One is rtconfig.h, which is used to add and delete system components; the other is template.uvproj, which is the template of the generated keil project. Don't delete it. Next, use the notepad to open the rtconfig.py file, which is the giant Makefile that defines the compiler. We use keil, so modify the installation path of keil and see where your keil is installed. If they are consistent, you don't need to change it. In fact, there is an SConscript file under each folder. This is the file that associates the files. If you look carefully, you will know how it works.
 It is much neater, much cleaner than porting it manually. Open board.c/board.h in Drivers to initialize the board. If you look at board.h, you will find that the board uses USART2 and the memory is wrong. You need to change the red ones below (if you are using usart, you don't need to change them). If you are not using the default pins, open usart.c and change the pins.
Keywords:stm32f429
Reference address:stm32f429 Porting RT_Thread
Of course, the popular STM32 is no exception; the biggest feature of RTT is that the number of threads is unlimited, and it supports multi-tasking systems with threads as the basic scheduling unit. The scheduling algorithm is a priority-based fully preemptive thread scheduling, supporting 256 thread priorities (can also be configured as 32 thread priorities), 0 priority represents the highest priority, and 255 priority is reserved for idle threads; multiple threads are supported at the same priority, and these threads of the same priority use time slice round-robin scheduling with a settable time slice length; the time the scheduler takes to find the next highest priority ready thread is constant (O(1)). The system does not limit the number of threads, it is only related to the specific memory of the physical platform.
As of February 2014, RTT has been updated to version 1.2.0. Of course, STM32 has also released the latest 429/439, but RTT only supports 40X. However, the hardware difference between 40X and 429/439 is not very big, so we can use 40X as a template for transplantation.
Before porting, everyone should know that RTT relies on scons to compile and generate keil or IAR project files, so it is more convenient to use the scons tool when porting, and you don’t have to find those files yourself.
Before that, make sure you have installed Python and scons on your computer: Download address Python: http://www.python.org/download/ (I use Python 2.7 here)
scons: http://www.scons.org/download.php Select the version that suits your system
Install Python first; then add the Python installation path to the system PATH; then install scons all the way to next; it will be automatically installed to the XXX\Python27\Scripts directory, and then add this path to the system PATH; after that, run Python -v and scons -v in cmd to see if the installation is successful.
Next, go to the RTT official website to download the source code. Generally, there will be a download link in the upper right corner of the homepage: After downloading, unzip it to the root directory of a disk: rename it to RT_Thread, such as D:\RT_Thread; add a RTT_ROOT variable in the system's system variables, fill in the path you just entered, and run set RTT_ROOT to see if it is successful.
Then download the library function of stm32f429.
Now go back to where you just placed the RT_thread file:


You can take a look at the rtconfig.h file to learn how to register a component and delete a component. By default, a finsh is enabled, so we will transplant this simple one first.
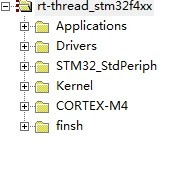
Open the command line cmd, switch to the stm32f40x directory, execute scons --target=mdk4 –s, and the keil project is now built. Keil opens the project; you will find that there are some problems with the keil settings. We manually change them, that is, the chip selection and the external crystal oscillator. After these two changes are made; let's take a look at the project file:
 It is much neater, much cleaner than porting it manually. Open board.c/board.h in Drivers to initialize the board. If you look at board.h, you will find that the board uses USART2 and the memory is wrong. You need to change the red ones below (if you are using usart, you don't need to change them). If you are not using the default pins, open usart.c and change the pins.
// Internal SRAM memory size[Kbytes] <8-64>
// Default: 64
#define STM32_SRAM_SIZE 192 //stm32f429 is 256K. There are 192K after 0x20000000 and 64K at 0x10000000
#define STM32_SRAM_END (0x20000000 + STM32_SRAM_SIZE * 1024)
#define RT_USING_UART1
//#define RT_USING_UART2
//#define RT_USING_UART3
// Console on USART: <0=> no console <1=>USART 1 <2=>USART 2 <3=> USART 3
// Default: 1
#define STM32_CONSOLE_USART 1
Next folder STM32_Stperiph: This file is modified a little more, because it is somewhat inconsistent with the library file of STM32F429, first remove all the files in this directory; look at the last startup assembly file, it is also wrong, didn’t you download the library file of stm32f429 before, replace the library file required by 429 with the file under STM32_Stperiph, and replace the original startup_stm32f4xx.s with the startup_stm32f429_439xx.s, respectively in the files just copied stm32f40x\Libraries\STM32F4xx_StdPeriph_Driver\inc src and
stm32f40x\Libraries\CMSIS\ST\STM32F4xx\Source\Templates\arm directory. Then add this file to STM32_Stperiph.
Then we compile it first, and we will find an error. Why? Because we forgot to change another file, that is stm32f4xx_conf.h; it is in the stm32f4xx\drivers directory, copy the stm32f4xx_conf.h in the newly downloaded library file.
After compiling once, it should pass. After downloading, you can see the serial port print out information.
Once again, make sure your crystal is 25MHz. If it is 8MHz, you must add the following to stm32f4xx_conf.h: (This is stated in readme.txt)
#if defined (HSE_VALUE)
/* Redefine the HSE value; it's equal to 8 MHz on the STM32F4-DISCOVERY Kit */
#undef HSE_VALUE
#define HSE_VALUE ((uint32_t)8000000)
#endif /* HSE_VALUE */
Previous article:stm32f10x interrupt priority
Next article:STM32 timer application
- Popular Resources
- Popular amplifiers
Recommended Content
Latest Microcontroller Articles
- Learn ARM development(16)
- Learn ARM development(17)
- Learn ARM development(18)
- Embedded system debugging simulation tool
- A small question that has been bothering me recently has finally been solved~~
- Learn ARM development (1)
- Learn ARM development (2)
- Learn ARM development (4)
- Learn ARM development (6)
He Limin Column
Microcontroller and Embedded Systems Bible
 Professor at Beihang University, dedicated to promoting microcontrollers and embedded systems for over 20 years.
MoreSelected Circuit Diagrams
MorePopular Articles
- LED chemical incompatibility test to see which chemicals LEDs can be used with
- Application of ARM9 hardware coprocessor on WinCE embedded motherboard
- What are the key points for selecting rotor flowmeter?
- LM317 high power charger circuit
- A brief analysis of Embest's application and development of embedded medical devices
- Single-phase RC protection circuit
- stm32 PVD programmable voltage monitor
- Introduction and measurement of edge trigger and level trigger of 51 single chip microcomputer
- Improved design of Linux system software shell protection technology
- What to do if the ABB robot protection device stops
MoreDaily News
- Why software-defined vehicles transform cars from tools into living spaces
- How Lucid is overtaking Tesla with smaller motors
- Wi-Fi 8 specification is on the way: 2.4/5/6GHz triple-band operation
- Wi-Fi 8 specification is on the way: 2.4/5/6GHz triple-band operation
- Vietnam's chip packaging and testing business is growing, and supply-side fragmentation is splitting the market
- Vietnam's chip packaging and testing business is growing, and supply-side fragmentation is splitting the market
- Three steps to govern hybrid multicloud environments
- Three steps to govern hybrid multicloud environments
- Microchip Accelerates Real-Time Edge AI Deployment with NVIDIA Holoscan Platform
- Microchip Accelerates Real-Time Edge AI Deployment with NVIDIA Holoscan Platform
Guess you like
- [Environmental Expert's Smart Watch] Part 13: Storing various data in EEPROM
- Behavioral modeling sequential logic circuit (two-input AND gate) source code and test code
- Hardware testing method for TI-CC chip
- Why does Unico prompt that STEVAL-MKI197V1 is not supported? --- Solved
- Is the digital-to-analog configuration of a certain pin of STM32 related to the output? Do I need to set the output register of this pin when outputting?
- EEWORLD University ---- Microprocessor and Embedded System Design University of Electronic Science and Technology of China
- MSP430G2553 Study Notes
- Resistor power selection problem
- [GD32L233C-START Review] 2. Non-blocking way to light up, blink, blink, blink...
- MSP432P401M MSP432P4xx: Falcon Series

 HA9P5104-5


 京公网安备 11010802033920号