How to convert digital values into analog values by connecting MCP4725 with Arduino
Source: InternetPublisher:难得正经 Keywords: adc analog to digital converter Arduino Updated: 2024/12/31
We all know that microcontrollers can only process digital values, but in the real world we have to deal with analog signals. That is why ADC ( Analog to Digital Converter) can convert the real world analog values into digital form so that the microcontroller can process the signal. But what if we need an analog signal from a digital value, then here comes DAC ( Digital to Analog Converter).
A simple example of a digital to analog converter is when a song is recorded in a recording studio, where the artist singer is singing using a microphone. These analog sound waves are converted into digital form and then stored in a digital format file, and when the song is played using the stored digital file, these digital values are converted into analog signals for speaker output. So DAC is used in this system.
DACs can be used in many applications such as motor control, controlling the brightness of LED lights, audio amplifiers, video encoders, data acquisition systems, etc.
In many microcontrollers, there is an internal DAC that can be used to produce analog output. But Arduino processors like ATmega328/ATmega168 do not have an inbuilt DAC. Arduino has an ADC feature (Analog to Digital Converter), but it does not have a DAC (Digital to Analog Converter). It has a 10-bit DAC in the internal ADC, but this DAC cannot be used alone. So in this Arduino DAC tutorial, we have used an add-on board called MCP4725 DAC module along with Arduino.
MCP4725 DAC Module (Digital-to-Analog Converter)
The MCP4725 IC is a 12-bit Digital to Analog Converter module that is used to generate an output analog voltage of (0 to 5V) and is controlled through I2C communication. It also has an on-board non-volatile memory EEP ROM.
This IC has 12-bit resolution. That means we use (0 to 4096) as input to give a voltage output with respect to a reference voltage. The maximum reference voltage is 5V.
Formula for calculating output voltage
O/P Voltage = (Reference Voltage/Resolution) x Digital Value
For example, if we use 5V as reference voltage, assume the digital value is 2048. So calculate the DAC output.
O/P voltage = (5/4096) x 2048 = 2.5V
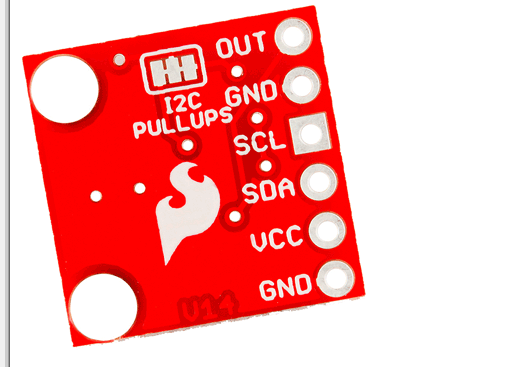
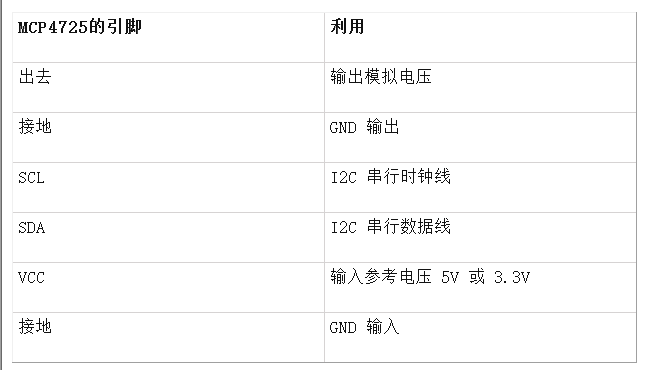
Pinout of MCP4725
Below is an image of the MCP4725 with the pin names clearly labeled.
I2C Communication in the MCP4725 DAC
This DAC IC can be connected with any microcontroller through I2C communication. I2C communication requires only two wires SCL and SDA. By default, the I2C address of MCP4725 is 0x60 or 0x61 or 0x62. For me it is 0x61. Using I2C bus, we can connect multiple MCP4725 DAC ICs. The only thing is we need to change the I2C address of the IC. I2C communication in Arduino has been explained in detail in the previous tutorials.

In this tutorial, we will interface the MCP4725 DAC IC with Arduino Uno and provide analog input values to Arduino pin A0 using a potentiometer. Then ADC will be used to convert the analog values into digital form. After that, these digital values are sent to MCP4725 through I2C bus to be converted into analog signals using DAC MCP4725 IC. Arduino pin A1 is used to check the analog output of MCP4725 from pin OUT and finally the ADC and DAC values and voltage are displayed on 16x2 LCD display.
Required Components
Arduino Nano / Arduino Uno
16x2 LCD display module
MCP4725 DAC Integrated Circuit
10k potentiometer
Breadboard
Jumper Wires
Circuit Schematic
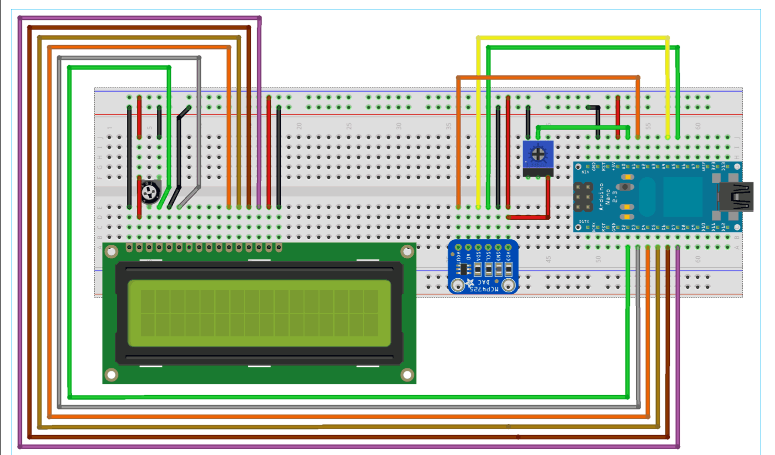
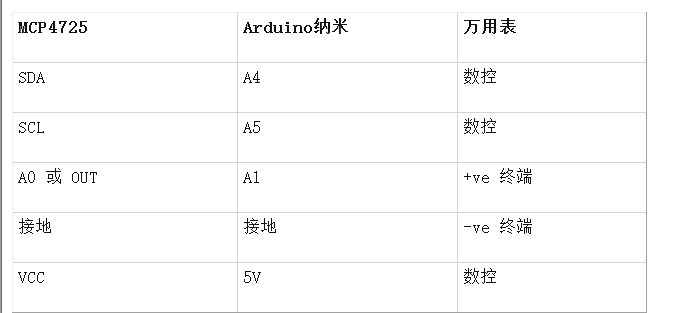
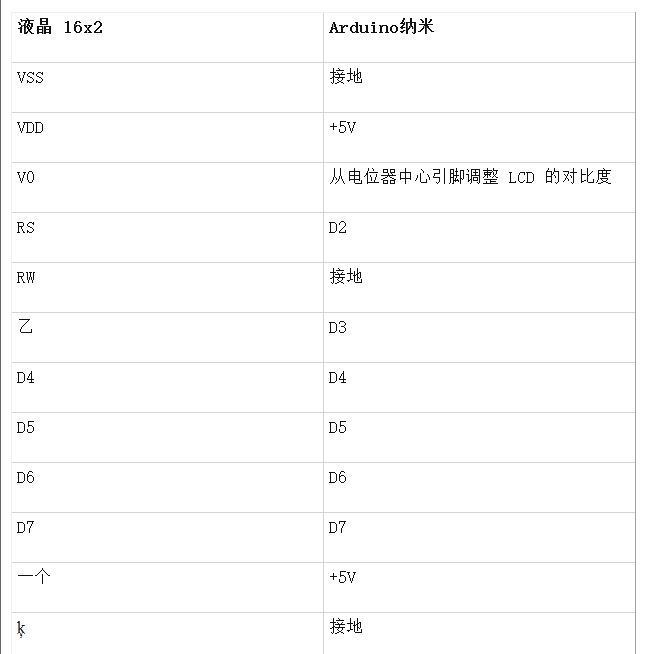
The following table shows the connections between MCP4725 DAC IC, Arduino Nano and Multimeter
Connection between 16x2 LCD and Arduino Nano
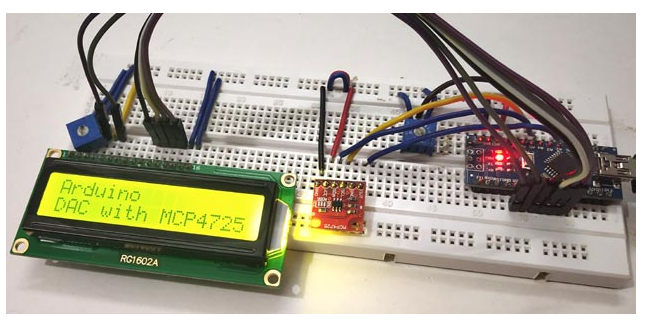
Using the potentiometer, the center pin is connected to the A0 analog input of the Arduino Nano, the left pin is connected to GND, and the rightmost pin is connected to the 5V of the Arduino.
DAC Arduino Programming
The complete Arduino code for the DAC tutorial is at the end with a demonstration video. Here we explain the code line by line.
First, include the I2C and LCD libraries using the wire.h and liquidcrystal.h libraries.
#include
Next, define and initialize the LCD pins according to the pins we connected with Arduino Nano
LCD(2,3,4,5,6,7); //Define LCD display pins
Next, define the I2C address of the MCP4725 DAC IC
#define MCP4725 0x61
In void setup()
First start I2C communication on pins A4 (SDA) and A5 (SCL) of Arduino Nano
Wire.begin(); //Start I2C communication
Next set the LCD display to 16x2 mode and display the welcome message.
lcd.start(16,2); //Set LCD to 16X2 mode
lcd.print("CIRCUIT DIGEST");
  delay(1000);
  lcd.clear();
  lcd.setCurs
In the void loop()
1. First put the control byte value (0b01000000) in buffer[0]
(010-Set MCP4725 to write mode)
buffer[0] = 0b01000000;
2. The following statement reads the analog value from pin A0 and converts it to a digital value (0-1023). The Arduino ADC is 10-bit resolution, so multiplying it by 4 gives: 0-4096, since the DAC is 12-bit resolution.
adc = analogRead(A0)*4;
3. This statement calculates the voltage from the ADC input value (0 to 4096) and the reference voltage of 5V
float ipvolt = (5.0/4096.0)*adc;
4. The first line below places the most significant bit value in buffer [1] by shifting 4 bits to the right in the ADC variable, and the second line places the least significant bit value in buffer [2] by shifting 4 bits to the left in the ADC variable.
buffer[1] = adc >> 4;
buffer[2] = adc << 4;
5. The following statement reads the analog voltage from A1 which is the DAC output (OUTPUT pin of the MCP4725 DAC IC). This pin can also be connected to a multimeter to check the output voltage. Learn how to use a multimeter here.
Unsigned int analogRead = analogRead(A1)*4;
6. In addition, the voltage value of the variable analogread is calculated using the following formula
float opvolt = (5.0/4096.0)*analogReading;
7. The following statement is used to start transmitting using MCP4725
Wire.beginTransmission(MCP4725);
Send control byte to I2C
Wire.wri
Send MSB to I2C
Wire.write(buffer[1]);
Send LSB to I2C
Wire.write(buffer[2]);
End of transfer
Wire.endTransmission();
Now finally display these results in LCD 16x2 display using lcd.print()
lcd.setCursor(0,0);
lcd.print("A IP:");
  lcd.print(adc);
  lcd.setCursor(10,0);
  lcd.print("V:");
  lcd.print(ipvolt);
  lcd.setCursor(0,1);
  lcd.print("D OP:");
  lcd.print(analogRead);
  lcd.setCursor(10,1);
  lcd.print("V:");
  lcd.print(opvolt);
  delay(500);
  lcd.clear();
Digital-to-Analog Conversion Using MCP4725 and Arduino
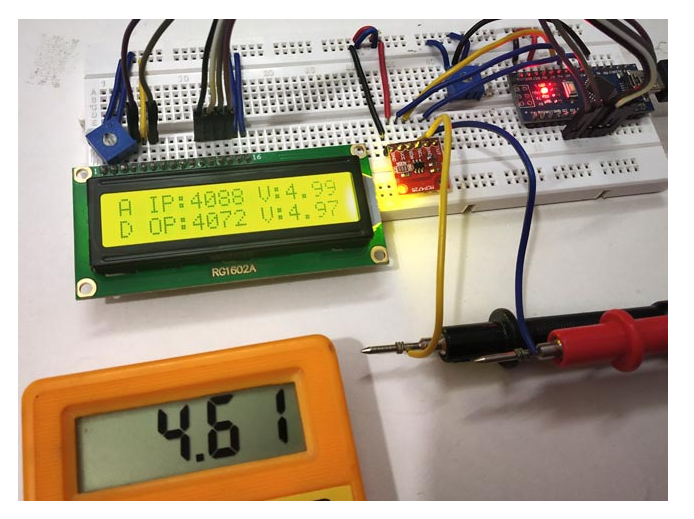
After completing all the circuit connections and uploading the code to Arduino, vary the potentiometer and observe the output on LCD. The first line of LCD displays the input ADC value and voltage and the second line displays the output DAC value and voltage.
You can also check the output voltage by connecting a multimeter to the OUT and GND pins of the MCP4725.
#include
- Share an electronic touch organ circuit
- How to use Tesseract for optical character recognition on Raspberry Pi
- How to implement semaphores and mutexes in FreeRTOS using Arduino
- How to Make a Buzz Wire Game Using Arduino
- IoT-based pet feeder
- DIY a simple weather station
- Design a pet NFC timer feeder
- Experiment on making a demonstration device for mobile phone electromagnetic radiation
- Detailed explanation of car battery charging circuit diagram
- Design of TinyML Image Classification Camera Based on ESP32
- Circuit composed of ADC 0808-ADC 0809 chips
- Typical channel monitoring circuit diagram
- Using ICL7107 digital voltmeter circuit diagram
- Successive Approximation Analog-to-Digital Converter
- ADC circuit schematic diagram
- ADC701 simple block diagram
- ADC614 internal circuit structure diagram
- ADC614 circuit block diagram
- ADC circuit
- ADC0816 and INTEL8031 form a 16-input 8-bit AD system


 京公网安备 11010802033920号