1. Detection system
The fiber end face defect machine vision inspection system proposed in this paper consists of a fiber end face detector and a PC system. During the inspection, the fiber connector is inserted into the fixed test platform of the fiber end face detector, and the fiber end face detector is connected to the PC system via a USB cable, so that the image can be collected in the computer. Adjust the focal length of the microscope, and once a satisfactory image is obtained, start the software to analyze the fiber end face and compare it with the standard indicators preset by the software, so as to quantitatively determine the information of each area and judge whether the fiber end face is qualified or not.
The system's inspection results are related to the software's capabilities, the microscope's performance, and the operator's skills in focusing the image. It has been proven to be significantly superior to manual inspection in terms of accuracy, repeatability, reproducibility, and inspection efficiency. The solution can also provide detailed records of inspection results, including end-face images and damage detection data, to improve the system's automation level.
2. Testing process
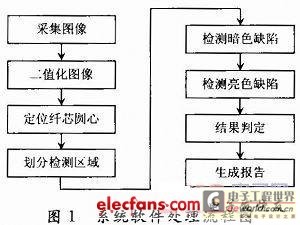
The detection software used in this system is developed based on the VBAI visual automatic detection development environment and has the ability to process and analyze optical fiber end face images. The processing flow is shown in Figure 1.

When using a fiber end face detector to collect images of the fiber end face, since the position of the fiber end face in the field of view is different each time, the position of the fiber core of the fiber end face must be located before a series of tests can be performed on it. To locate the position of the fiber core, the collected image must first be binarized. Because the initial image collected by the fiber end face detector is 32-bit, and the function modules for image analysis and processing in VBAI basically do not support 32-bit images, only by converting the 32-bit image into a binary image can a series of accurate analyses be performed on it. Use the Vision Assistant function module of VBAI to process the initial image, and obtain a grayscale 8-bit image through the sub-function of extracting the color value (Extract HSL), and then use the threshold method to binarize the image.
The threshold method is a simple and effective image segmentation method. This method uses one or several thresholds to divide the grayscale of the image pixels into several levels. Pixels belonging to the same level are considered to be the same type of object. It should be noted that during the inspection of the optical fiber end face, since the cladding may belong to the same grayscale as the dirt outside the cladding, the dirt on the cladding cannot be inspected at the same time as the dirt outside the cladding. The cladding needs to be shielded before inspection.
In this system, let F(x, y) represent the output of the binary image, and its pixel grayscale range is [a, b]. When detecting the same type of defects, it is only necessary to set a threshold TH between a and b to divide the pixels of the image into two parts: the pixel group greater than TH (defects) and the pixel group less than TH (background). That is:

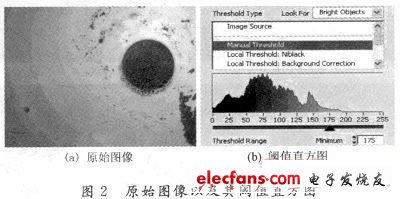
The image binarization sets the gray value of defective pixels to 0 and the gray value of background pixels to 1. In the visual assistant function module of VBAI, there is a function submodule for setting the threshold. When calling it, you only need to find the peaks and valleys on the threshold histogram according to the bimodal method, and manually adjust the threshold value so that it can distinguish defects from the background, as shown in Figure 2.

2.1 Fiber Core Positioning
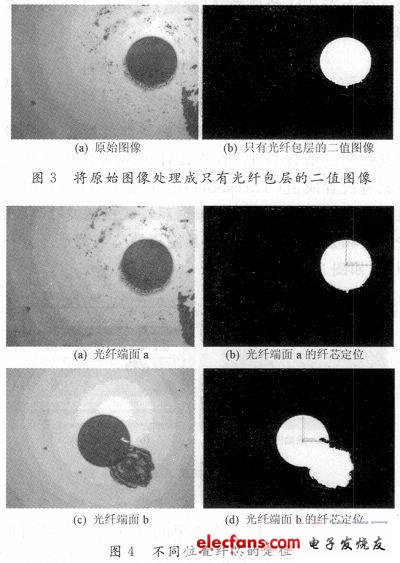
The method used in this paper to locate the fiber core is to first find the entire cladding of the fiber. Since the shape of the fiber cladding is a circle, the center of this circle is the center of the fiber core. If there is a large degree of pollution on the fiber end face, if you only set a certain threshold to binarize the image, the binary image obtained may have a lot of dirt in addition to the fiber cladding, which will have a great impact on the positioning of the fiber cladding. Therefore, after the image is binarized, it is necessary to use some sub-function modules in the visual assistant to perform some morphological processing on the image. Use the two function sub-modules of Remove Small Objects and Remove Large Objects to adjust the number of iterations, filter out particles smaller and larger than the fiber cladding, thereby removing interference with the positioning of the fiber cladding, so that the binary image obtained only contains the image of the fiber cladding, as shown in Figure 3.

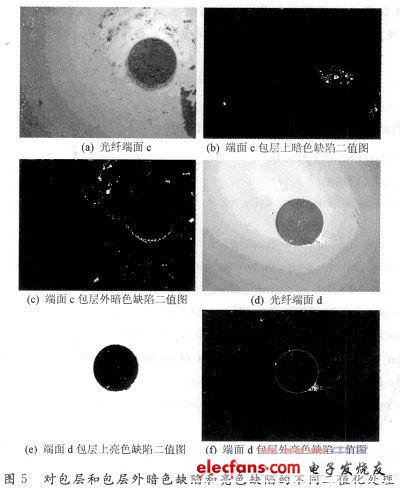
After obtaining the binary image of the optical fiber cladding, the position of the optical fiber core can be accurately located by using the function modules of Find Circular Edge and Set Coordinate System in VBAI. The purpose of finding the circular edge is to find the edge of the optical fiber cladding circle, so as to find the center of the optical fiber cladding circle, which is also the center of the core circle, and then establish a coordinate system with this center as the origin of the coordinate system. In VBAI, the function of the function of establishing a coordinate system is a positioning feature. It can automatically locate the center of the cladding circle according to the found cladding circle. Even if the position of the cladding in the image changes, the origin of the coordinate system can be accurately located at the center of the cladding circle, and the center of the cladding circle is the center of the core circle. As shown in Figure 4, the origin of the coordinate system can be accurately located at the center of the core circle at different positions, even on an irregular cladding surface.
2.2 Division of detection area
After locating the fiber core, since the detection standards used in different circular rings on the fiber end face are also different, circular rings of different areas should be made with the center of the fiber core as the center, and then the detection should be carried out in each circular ring according to the specified detection standards. If the detection in any circular ring fails, the fiber is defective and cannot pass. When dividing the area, since the image collected by the fiber end face detector is measured in pixels (pix) in the VBAI environment, and the fiber end face detection requirements given in the general detection standard are measured in microns (μm), it is necessary to convert microns (μm) into pixels (pix) through formula (2). When converting, you need to know a parameter: dpi (dots per inch). Knowing dpi, you can get the conversion relationship between pixels and microns from formula (2). Let P be pixels, D be dpi, I be feet, and M be microns, then:

The dpi of an image can be obtained through some commonly used image viewing software (such as Acdsee, Photoshop, etc.). The dpi of the standard resolution of 640×480 or 800×600 is a constant: 96. In this way, when dividing the fiber end face into regions, the diameter of each ring can be accurately calculated, so that the entire fiber end face can be carefully and accurately detected.
2.3 Defect Detection
2.3.1 Different Thresholds
Fiber end face defects include white spots (chips), black spots (dirt), shadows (internal cracks) and scratches. Chips and scratches are brighter than the fiber end face, while dirt and shadows are darker than the fiber end face. To detect these defects, the original image must be reprocessed before each bright part of each area is detected, and the original image must be reprocessed before each dark part of each area is detected, so as to set different thresholds to distinguish between parts brighter than the fiber end face and parts darker than the fiber end face. In this way, the dark part and the bright part are tested successively during the detection process. If any of the two tests fails, the detection of this area will fail.
The area of the fiber end face that needs to be inspected includes the fiber cladding and the ceramic part outside the fiber cladding, so light defects and dark defects may be distributed on the ceramic surface in addition to the fiber cladding. Since the fiber cladding is dark in the collected image, the color is close to the dark defect, while the color of the ceramic part outside the cladding is closer to the light defect. Therefore, when detecting defects on the fiber cladding and on the ceramic surface outside the cladding, different thresholds need to be set for dark defects and light defects respectively to accurately detect defects on the entire end face. Therefore, when using VBAI to detect the ceramic surface area outside the fiber cladding, it is necessary to re-set the threshold according to the double peak method, as shown in Figure 5.

As shown in Figure 5, during the detection process, different thresholds must be set for the different distributions of dark defects and bright defects inside and outside the fiber end coating, otherwise the detection accuracy will be greatly affected. It should be noted that the fiber core itself is bright, so the fiber core needs to be ignored during the bright defect detection process.
2.3.2 Defect determination
In the defect detection of optical fiber end faces, there are both unacceptable defects and acceptable defects. For defect particles such as chipping, dirt, internal cracks and scratches, whether they are acceptable depends on their size and length. Generally, their size and length are evaluated mainly based on the size of their Feret diameter. Feret diameter is a commonly used method to express particle diameter. For regular spherical particles, "diameter" can be used to accurately describe their size. However, in most cases, the shape of particles, especially scratches, is not spherical. Using diameter to express is obviously inaccurate and easy to cause misunderstanding. Therefore, the concept of "particle diameter" is used to express particle size. The so-called particle diameter is the "one-dimensional" size that represents the particle size. "Dimension" is also called dimension, which is a unit of measurement for basic physical quantities, such as length, volume, mass, time, etc. For the same particle, due to different application scenarios, the measurement methods are often different, and the obtained particle diameter values are of course different. For example, what is observed under a microscope is the size of the particle on the plane perpendicular to the line of sight, the particle size obtained by screening is the sieve hole size, and the diameter obtained by sedimentation is the diameter of spherical particles with the same sedimentation characteristics, etc.
In the machine vision inspection of optical fiber end face defects in this article, the Feret diameter of the defect to be measured after the image is binarized is the size on the plane perpendicular to the line of sight under the microscope. The Feret diameter of any irregular object can be large or small. What is usually needed is the maximum Feret diameter, which is then compared with the inspection standard. If the maximum Feret diameter is larger than the acceptable defect particle diameter, the inspection fails. VBAI is very powerful. It provides a function that can directly measure the maximum Feret diameter (Max Feret Diameter). This allows the maximum Feret diameter of various defect particles to be measured quickly and easily, including scratches with linear features. The maximum Feret diameter of the scratch is its length. In the visual assistant function module of VBAI, there is a sub-function module called Particle Filter, which can set the maximum Feret diameter value within a certain range, and then filter the maximum Feret diameter within this range.
All defective particles within the range are filtered out, and then the judgment is made. For example, in a detection area, it is required that the number of defective particles with a maximum Feret diameter less than or equal to 5 μm should not exceed 5, and there should be no defective particles larger than 5 μm. Using formula (2), it can be calculated that after 400 times magnification, 5 μm is converted into a pixel value of approximately 7.559 pix. Then, using the particle filter function module, first filter out the defective particles with a maximum Feret diameter less than 7.559 pix, and use the particle analysis (Detect Objects) function module to detect the number of particles. If particles are detected, it is determined that it cannot pass; then use the particle filter function module again to filter out the particles with a maximum Feret diameter greater than 7.559 pix, and still use the particle analysis function module to detect the number of particles. If more than 5 particles are detected, it is determined that it cannot pass.
After inspecting all areas, call the Set Inspection Status function module in VBAI, which has an option "Fail if Any Previous Step Fails" to fail the inspection. If this option is selected, if the inspection of any previous area fails, the inspection of the fiber end face will be judged as failed, so that any inspection area that does not meet the inspection requirements will not be missed.
2.4 Report Generation
As the most intuitive and important evidence for testing test results, reports are an indispensable part of the test system. After each fiber end face inspection is completed, a lot of data will be generated, including the number and size of defects in each inspection area. If these data are automatically imported into Excel or Word files after specifying the file path, it can not only improve the automation of the entire inspection system, but also greatly reduce the workload of testers. Therefore, a data export (Data Logging) function module is added to the end of the program to save the data in Excel format on the local computer hard disk or upload it to the FTP server and save it, so as to improve the security and reliability of the data and facilitate viewing at any time.
3 Conclusion
This paper combines image processing technology and develops a fiber end face defect detection system based on machine vision according to the collected fiber end face images. Experiments have proved that this system can detect and judge the defects of the fiber end face with high efficiency and high quality, avoiding operational errors caused by manual inspection and greatly improving the reliability of detection.
In addition to the application of optical fiber end face detection in this article, with the help of high-tech detection technologies such as infrared, ultraviolet, X-ray, and ultrasonic, machine vision has more outstanding advantages in detecting non-visual objects and high-risk scenes. Therefore, machine vision detection will become an increasingly popular solution.
Previous article:Circuit for testing capacitors
Next article:Application of magnetoresistive sensor HMC102 in vehicle detection
- High signal-to-noise ratio MEMS microphone drives artificial intelligence interaction
- Advantages of using a differential-to-single-ended RF amplifier in a transmit signal chain design
- ON Semiconductor CEO Appears at Munich Electronica Show and Launches Treo Platform
- ON Semiconductor Launches Industry-Leading Analog and Mixed-Signal Platform
- Analog Devices ADAQ7767-1 μModule DAQ Solution for Rapid Development of Precision Data Acquisition Systems Now Available at Mouser
- Domestic high-precision, high-speed ADC chips are on the rise
- Microcontrollers that combine Hi-Fi, intelligence and USB multi-channel features – ushering in a new era of digital audio
- Using capacitive PGA, Naxin Micro launches high-precision multi-channel 24/16-bit Δ-Σ ADC
- Fully Differential Amplifier Provides High Voltage, Low Noise Signals for Precision Data Acquisition Signal Chain
- Innolux's intelligent steer-by-wire solution makes cars smarter and safer
- 8051 MCU - Parity Check
- How to efficiently balance the sensitivity of tactile sensing interfaces
- What should I do if the servo motor shakes? What causes the servo motor to shake quickly?
- 【Brushless Motor】Analysis of three-phase BLDC motor and sharing of two popular development boards
- Midea Industrial Technology's subsidiaries Clou Electronics and Hekang New Energy jointly appeared at the Munich Battery Energy Storage Exhibition and Solar Energy Exhibition
- Guoxin Sichen | Application of ferroelectric memory PB85RS2MC in power battery management, with a capacity of 2M
- Analysis of common faults of frequency converter
- In a head-on competition with Qualcomm, what kind of cockpit products has Intel come up with?
- Dalian Rongke's all-vanadium liquid flow battery energy storage equipment industrialization project has entered the sprint stage before production
- Allegro MicroSystems Introduces Advanced Magnetic and Inductive Position Sensing Solutions at Electronica 2024
- Car key in the left hand, liveness detection radar in the right hand, UWB is imperative for cars!
- After a decade of rapid development, domestic CIS has entered the market
- Aegis Dagger Battery + Thor EM-i Super Hybrid, Geely New Energy has thrown out two "king bombs"
- A brief discussion on functional safety - fault, error, and failure
- In the smart car 2.0 cycle, these core industry chains are facing major opportunities!
- The United States and Japan are developing new batteries. CATL faces challenges? How should China's new energy battery industry respond?
- Murata launches high-precision 6-axis inertial sensor for automobiles
- Ford patents pre-charge alarm to help save costs and respond to emergencies
- New real-time microcontroller system from Texas Instruments enables smarter processing in automotive and industrial applications
- [RVB2601 development board trial experience] Build a development environment and test the serial port routine
- Is there a better analog switch than CD4051?
- Lichee RV 86 PANEL Review (3) - Building a cross-compilation chain under WSL single system
- DSP bootloarder C5000
- What is the minimum distance that the inductor of a switching power supply chip should be kept from the edge of the board?
- SinlinxA33 builds Qt App development environment to write helloworld
- [Qinheng RISC-V core CH582] Transplanting RF code 02
- MSP430G2553 official development board music player
- LPS22HB pressure sensor PCB package and code
- In PADS, VIA Stitch is gray

 Hardware Accelerators in Autonomous Driving
 ICCV2023 Paper Summary: Vision Applications and Systems


 京公网安备 11010802033920号