This design uses the AT89S52 microcontroller and 1602 LCD to display the calendar (year, month, day), week and time. The specific effects are:
2011-11-11 FRI
11:11:11
2. Design drawings
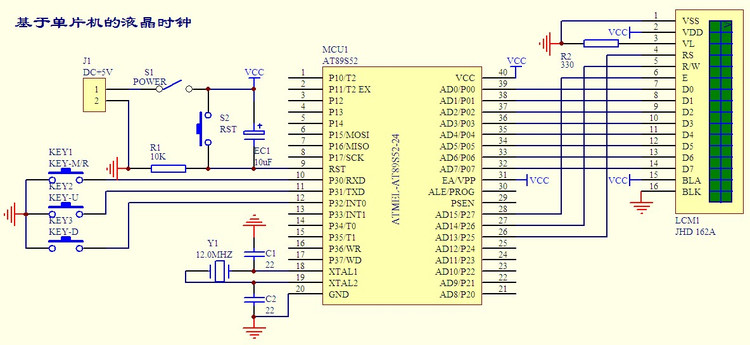
1. Circuit diagram

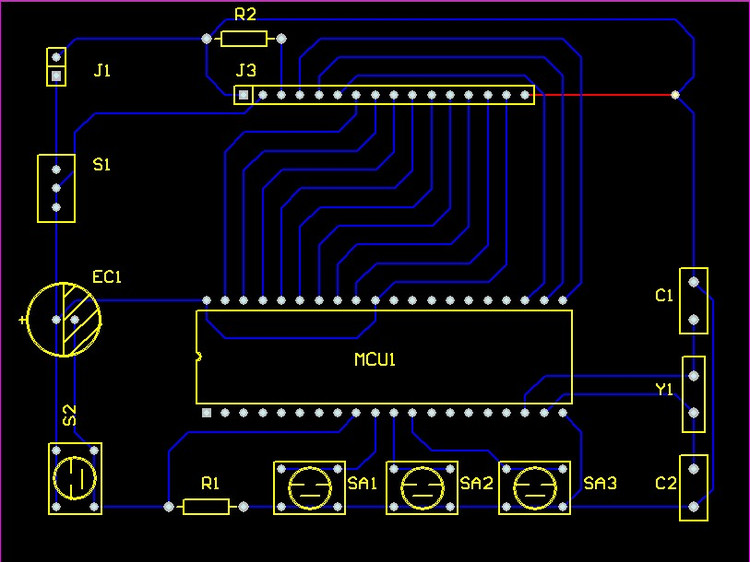
2. PCB diagram

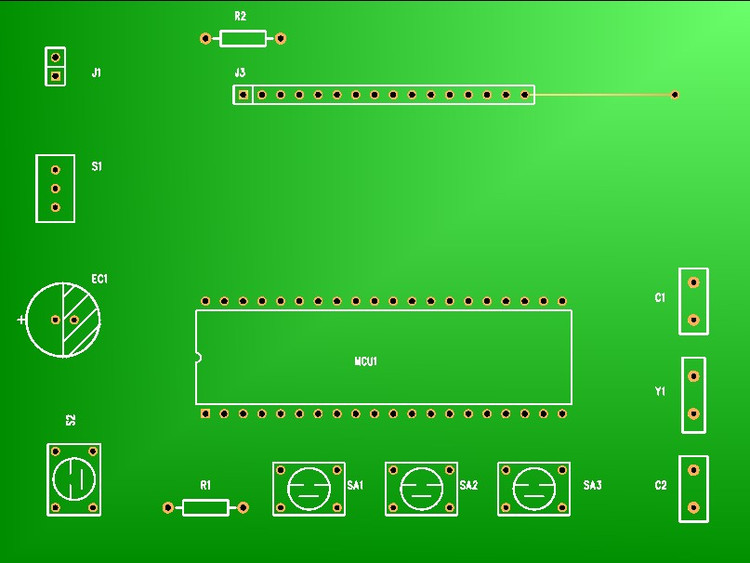
3. 3D Model

III. Related procedures
Program introduction: After the program starts, the LCD and two timers are initialized first, the clock starts working, and then the scan detection and clock adjustment function is entered. Whether to adjust the clock is determined by whether KEY1 is long pressed. Timer T0 is used to generate clock timing, T1 is used to interrupt the LCD display, and key KEY1 is a multi-function key. When the clock is working, long press to enter the clock adjustment, and adjust the year, month, day, week, hour, and minute in turn. KEY2 and KEY3 are respectively adjusted up and down. After each adjustment, short press KEY1 to return and enter the next adjustment.
1. Main program file
#include "reg51.h"
#include "adjust.h"
#include "lcm.h"
#include "key.h"
//Timer initialization function
void Timer_Start()
{
TMOD=0x11;
TH1=0xfc;
TL1=0x18;
TH0=0xfc;
TL0=0x60;
EA=1;
ET1=1;
ET0=1;
TR1=1;
TR0=1;
}
//Main function
void main()
{
unsigned char Key_Code;
//Initialize LCM
LCM_START();
//Initialize timer
Timer_Start();
while(1)
{
Key_Code=Key_Scan();
switch(Key_Code)
{
case Key_M:Adjust();break;
default:break;
}
}
}
2. Delay program file
(1) Header file
#ifndef __DELAY_H__
#define __DELAY_H__
extern void Delay_ms(unsigned int ms);
#endif
(2) Program files
#include "delay.h"
//1 millisecond delay function
void Delay_ms(unsigned int ms)
{
unsigned char Temp;
while(ms--)
for(Temp=0;Temp<120;Temp++);
}
2. Clock program file
(1) Header file
#ifndef __CLOCK_H__
#define __CLOCK_H__
extern unsigned int Second_Count;
extern char Second;
extern char Minute;
extern char Hour;
extern char Day;
extern char Month;
extern int Year;
extern char Week;
extern char Month_Day[12];
extern bit Leap_Year(int Temp_Year);
#endif
(2) Program files
#include "reg51.h"
//Seconds count variable
unsigned int Second_Count=0;
//Hours, minutes and seconds variables
char Second=53;
char Minute=20;
char Hour =5;
char Day =18;
char Month =4;
int Year =2011;
char Week =1;
//Days of the month array
char Month_Day[12]={31,28,31,30,31,30,31,31,30,31,30,31};
//闰年判断函数
bit Leap_Year(int Temp_Year)
{
bit Temp;
if(((Temp_Year%4==0)&&(Temp_Year%100!=0))||(Temp_Year%400==0))
{
Temp=1;
}
else
{
Temp=0;
}
return Temp;
}
//定时器0中断服务函数
void Timer0_Serve()interrupt 1
{
TH0=0xfc;
TL0=0x60;
Second_Count++;
if(Second_Count>1000)
{
Second_Count=0;
Second++;
if(Second>=60)
{
Second=0;
Minute++;
if(Minute>=60)
{
Minute=0;
Hour++;
if(Hour>=24)
{
Hour=0;
Week++;if(Week>=7)Week=0;
Day++;
if(Day>Month_Day[Month-1])
{
if((Month!=2)||(!Leap_Year(Year))||(Day>29))
{
Day=1;
Month++;
if(Month>12)
{
Month=1;
Year++;
}
}
}
}
}
}
}
}
3. LCD program file
(1) Header file
#ifndef __LCM_SHOW_H__
#define __LCM_SHOW_H__
extern void LCM_START();
extern void LCM_CMD (unsigned char Temp_Data);
extern void LCM_DATA(unsigned char Temp_Data);
extern void LCM_POS (unsigned char Temp_Data);
#endif
(2) Procedure
#include "reg51.h"
#include "delay.h"
#include "intrins.h"
//LCM control port definition
sbit RS=P2^5; //Data/command selection port
sbit RW=P2^6; //Read/write control port
sbit EN=P2^7; //Enable port
//Define trademark characters
char code Logo1[]="WELCOME TO";
char code Logo2[]="MY MCU WORKSHOP!";
//LCM status read function
bit LCM_Status()
{
bit Temp_Status;
RS=0;
RW=1;
EN=1;
_nop_();
Temp_Status=(bit)(P0&0x80);
_nop_();
EN=0;
return Temp_Status;
}
//LCM write initialization command function
void LCM_INIT(unsigned char Temp_Data)
{
RS=0;
RW=0;
EN=0;
_nop_();
P0=Temp_Data;
_nop_();
EN=1;
_nop_();
_nop_();
EN=0;
}
//LCM write command function
void LCM_CMD(unsigned char Temp_Data)
{
while(LCM_Status());
RS=0;
RW=0;
EN=0;
_nop_();
P0=Temp_Data;
_nop_();
EN=1;
_nop_();
_nop_();
EN=0;
}
//LCM write data function
void LCM_DATA(unsigned char Temp_Data)
{
while(LCM_Status());
RS=1;
RW=0;
EN=0;
_nop_();
P0=Temp_Data;
_nop_();
EN=1;
_nop_();
_nop_();
EN=0;
}
//LCM display position setting function
void LCM_POS(unsigned char Temp_Data)
{
LCM_CMD(Temp_Data|0x80);
}
//LCM initialization function
void LCM_START()
{
unsigned char Temp;
//Write initialization instruction three times but do not detect busy signal
LCM_INIT(0x38);
Delay_ms(5);
LCM_INIT(0x38);
Delay_ms(5);
LCM_INIT(0x38);
Delay_ms(5);
//Write the initialization command word
LCM_CMD(0x38);
Delay_ms(1);
//Write the clear screen command word
LCM_CMD(0x01);
Delay_ms(1);
//Write the address pointer and cursor automatic shift command word
LCM_CMD(0x06);
Delay_ms(1);
//Write the display on command word
LCM_CMD(0x0c);
Delay_ms(1);
Temp=0;
//Set the display position to the 4th column of the row
LCM_POS(0x03);
Delay_ms(1);
//Display the first line of the logo
while(Logo1[Temp]!='\0')
{
LCM_DATA(Logo1[Temp]);
Delay_ms(200);
Temp++;
}
Temp=0;
//Set the display position to the 2nd row and 1st column
LCM_POS(0x40);
Delay_ms(1);
//Display the second line of the logo
while(Logo2[Temp]!='\0')
{
LCM_DATA(Logo2[Temp]);
Delay_ms(200);
Temp++;
}
Delay_ms(2000);
//Clear the screen after displaying the logo
LCM_CMD(0x01);
Delay_ms(1);
}
4. Clock display file
(1) Header file
#ifndef __SHOW_H__
#define __SHOW_H__
extern unsigned char Show_Mark;
#endif
(2) Program files
#include "reg51.h"
#include "lcm.h"
#include "clock.h"
#include "delay.h"
#include "adjust.h"
//显示计数
unsigned int Show_Count=0;
unsigned char Show_Mark=0;
//定义时钟显示字符串
char Date[]="2011-04-17 SUN";
char Time[]="12:30:30 ";
//定义二维周字符数组
char Week_Name[7][3]={"SUN","MON","TUE","WED","THU","FRI","SAT"};
char Adjust_Mark[7][2]={" ","YY","MM","DD","WW","HH","MM"};
//LCM显示函数
void LCM_SHOW()
{
unsigned char Temp;
//显示之前转化日期为显示字符
Date[0]=Year/1000+0x30;
Date[1]=Year/100%10+0x30;
Date[2]=Year/10%10+0x30;
Date[3]=Year%10+0x30;
Date[5]=Month/10+0x30;
Date[6]=Month%10+0x30;
Date[8]=Day/10+0x30;
Date[9]=Day%10+0x30;
Date[11]=Week_Name[Week][0];
Date[12]=Week_Name[Week][1];
Date[13]=Week_Name[Week][2];
//显示之前转化时间为显示字符
Time[0]=Hour/10+0x30;
Time[1]=Hour%10+0x30;
Time[3]=Minute/10+0x30;
Time[4]=Minute%10+0x30;
Time[6]=Second/10+0x30;
Time[7]=Second%10+0x30;
//显示设定标记
Time[10]=Adjust_Mark[Show_Mark][0];
Time[11]=Adjust_Mark[Show_Mark][1];
Temp=0;
//设定显示位置为第一行1列
LCM_POS(0x01);
Delay_ms(1);
//显示日期和星期
while(Date[Temp]!='\0')
{
LCM_DATA(Date[Temp]);
Temp++;
}
Temp=0;
//设定显示位置为第二行4列
LCM_POS(0x44);
Delay_ms(1);
//显示时间
while(Time[Temp]!='\0')
{
LCM_DATA(Time[Temp]);
Temp++;
}
}
//中断方式显示LCM
void Timer1_Serve()interrupt 3
{
TH1=0xfc;
TL1=0x18;
Show_Count++;
if(Show_Count>100)
{
Show_Count=0;
LCM_SHOW();
}
}
5. Scan files by key
(1) Header file
#ifndef __KEY_SCAN_H__
#define __KEY_SCAN_H__
#define Key_M 0x10
#define Key_R 0x00
#define Key_U 0x01
#define Key_D 0x02
extern unsigned char Key_Scan();
#endif
(2) Program files
#include "reg51.h"
#include "delay.h"
#include "key.h"
//Key port definition
sbit Key1=P3^4;
sbit Key2=P3^5;
sbit Key3=P3^6;
//Keyboard scanning program
unsigned char Key_Scan()
{
//Scan mode selection key first
if(Key1==0)
{
Delay_ms(500); //Delay 0.5 seconds, one is the maximum time of a short press, the other is delay de-jitter
if(Key1==0) //Judge long and short keys
{
while(!Key1);//Wait for the key to be released
Delay_ms(100);//Eliminate release jitter
return Key_M;
}
else
{
return Key_R;
}
}
else
if(Key2==0) //Scan and add one key, with long press and continuous adjustment function
{
Delay_ms(300);
return Key_U;
}
else
if(Key3==0)
{
Delay_ms(300); // Scan and reduce one key, long press to continuously adjust the function
return Key_D;
}
else return 0xff;
}
6. Clock adjustment file
(1) Header file
#ifndef __ADJUST_H__
#define __ADJUST_H__
extern void Adjust();
#endif
(2) Program files
#include "reg51.h"
#include "Clock.h"
#include "adjust.h"
#include "show.h"
#include "Key.h"
//调整年函数
void Adjust_Year()
{
unsigned char Key_Code;
while(1)
{
Key_Code=Key_Scan();
switch(Key_Code)
{
case Key_R:return;
case Key_U:Year++;break;
case Key_D:Year--;break;
default :break;
}
}
}
//调整月函数
void Adjust_Month()
{
unsigned char Key_Code;
while(1)
{
Key_Code=Key_Scan();
switch(Key_Code)
{
case Key_R:return;
case Key_U:Month++;if(Month>12)Month=1;break;
case Key_D:Month--;if(Month<1)Month=12;break;
default:break;
}
}
}
//调整日函数
void Adjust_Day()
{
unsigned char Key_Code;
//调整日期之前先根据已经调整的月份修改日期
if(Day>Month_Day[Month-1])
{
if((Month!=2)||(!Leap_Year(Year))||(Day>29))Day=1;
}
while(1)
{
Key_Code=Key_Scan();
switch(Key_Code)
{
case Key_R:return;
case Key_U:Day++;
if(Day>Month_Day[Month-1])
{
if((Month!=2)||(!Leap_Year(Year))||(Day>29))Day=1;
}
break;
case Key_D:Day--;
if(Day<1)
{
if((Month==2)&&(Leap_Year(Year)))Day=29;
else Day = Month_Day[Month-1];
}
break;
default :break;
}
}
}
//调整星期函数
void Adjust_Week()
{
unsigned char Key_Code;
while(1)
{
Key_Code=Key_Scan();
switch(Key_Code)
{
case Key_R:return;
case Key_U:Week++;if(Week>=7)Week=0;break;
case Key_D:Week--;if(Week<0) Week=6;break;
default :break;
}
}
}
//调整小时函数
void Adjust_Hour()
{
unsigned char Key_Code;
while(1)
{
Key_Code=Key_Scan();
switch(Key_Code)
{
case Key_R:return;
case Key_U:Hour++;if(Hour>=24)Hour= 0;break;
case Key_D:Hour--;if(Hour<0) Hour=23;break;
default:break;
}
}
}
//Adjust the minute flashing function
void Adjust_Minute()
{
unsigned char Key_Code;
while(1)
{
Key_Code=Key_Scan();
switch(Key_Code)
{
case Key_R:return;
case Key_U:Minute++;if(Minute>=60)Minute= 0;break;
case Key_D:Minute--;if(Minute<0) Minute=59;break;
default:break;
}
}
}
//Total adjustment function
void Adjust()
{
//Pause the clock before adjustment
TR0=0;
//Clear the second related quantity
Second=0;
Second_Count=0;
//Adjust the year
Show_Mark=1;
Adjust_Year();
//Adjust the month
Show_Mark=2;
Adjust_Month();
//Adjust the day
Show_Mark=3;
Adjust_Day();
//Adjust the week
Show_Mark=4;
Adjust_Week();
//Adjust the hour
Show_Mark=5;
Adjust_Hour();
//Adjust the minute
Show_Mark=6;
Adjust_Minute();
//After adjustment, restart the clock
Show_Mark=0;
TR0=1;
}
IV. Description
1. Since the microcontroller is used to generate clock pulses, considering the inaccuracy of the microcontroller timing, although the initial value of timer 0 is modified many times, there is still an error of about 1 minute per day. Therefore, this design is only used to simulate the clock. If you want precise time, you can use the clock chip DS1302 to do experiments.
2. The design program and circuit have been verified by experiments and work reliably and meet expectations. If you are interested, you can make it and experiment with it.
3. If you need the program of this design, please leave a footprint.
Previous article:The microcontroller receives the command to send pulse
Next article:Simple alarm based on single chip microcomputer
 Professor at Beihang University, dedicated to promoting microcontrollers and embedded systems for over 20 years.
- Innolux's intelligent steer-by-wire solution makes cars smarter and safer
- 8051 MCU - Parity Check
- How to efficiently balance the sensitivity of tactile sensing interfaces
- What should I do if the servo motor shakes? What causes the servo motor to shake quickly?
- 【Brushless Motor】Analysis of three-phase BLDC motor and sharing of two popular development boards
- Midea Industrial Technology's subsidiaries Clou Electronics and Hekang New Energy jointly appeared at the Munich Battery Energy Storage Exhibition and Solar Energy Exhibition
- Guoxin Sichen | Application of ferroelectric memory PB85RS2MC in power battery management, with a capacity of 2M
- Analysis of common faults of frequency converter
- In a head-on competition with Qualcomm, what kind of cockpit products has Intel come up with?
- Dalian Rongke's all-vanadium liquid flow battery energy storage equipment industrialization project has entered the sprint stage before production
- Allegro MicroSystems Introduces Advanced Magnetic and Inductive Position Sensing Solutions at Electronica 2024
- Car key in the left hand, liveness detection radar in the right hand, UWB is imperative for cars!
- After a decade of rapid development, domestic CIS has entered the market
- Aegis Dagger Battery + Thor EM-i Super Hybrid, Geely New Energy has thrown out two "king bombs"
- A brief discussion on functional safety - fault, error, and failure
- In the smart car 2.0 cycle, these core industry chains are facing major opportunities!
- The United States and Japan are developing new batteries. CATL faces challenges? How should China's new energy battery industry respond?
- Murata launches high-precision 6-axis inertial sensor for automobiles
- Ford patents pre-charge alarm to help save costs and respond to emergencies
- New real-time microcontroller system from Texas Instruments enables smarter processing in automotive and industrial applications
- One article to understand the RF chip industry chain and its domestic status!
- Low-cost DIY nano-level lithography machine! This post-95s boy is popular...
- Type-C interface display solution
- Is there any module similar to Yiweilian?
- How to choose the right operational amplifier
- Maxim Basic Analog IC APP download helps you innovate analog design!
- How is the internal low-pass filter of Bh1415 designed? How is the 150pf connected to pin 3 determined?
- Its automobile inner wheel difference safety warning system
- Motor drive
- Detailed explanation of the principles of 24 typical application circuits of capacitors

 Design paper of dot matrix electronic display screen
 *** *** *** *** *** *** ***** ** Two wire/I2C Bus READ/WRITE Sample Routines of Microchip s ** 2
 LT1007CJG


 京公网安备 11010802033920号