In vacuum technology applications, gas microflow is measured by gas microflowmeters. Accurately measuring gas microflow (or leakage rate) is of great significance. For example, in order to keep the pressure in the spacecraft cabin working normally for a long time, it is necessary to detect leaks in the cabin. When detecting leaks, it is necessary not only to find the location of the leak, but also to accurately measure the tiny leak rate, which is especially important for manned spacecraft flying in space for a long time; rocket fuel is a flammable, explosive, and toxic gas or liquid. Tiny leaks are very dangerous, and safety inspections must be carried out on the filling process and launch site of rocket fuel; in the production process of semiconductor components, integrated circuits, and computer chips in the electronics industry, precise control of gas microflow injection is required to ensure process quality and stable product performance. In order to meet the above requirements, it is very necessary to develop a gas microflowmeter with higher measurement accuracy and reliability, wider measurement range, intuitive measurement interface, and high degree of automation. The virtual instrument system for gas microflow measurement constructed using virtual instrument technology is a research and exploration to achieve the above goals.
Establishment of virtual instrument system for gas microflow measurement
The measurement principle of gas microflow The
measurement principle of gas microflow is: when the gas flows out of its variable volume chamber, the servo motor drives the piston to move horizontally in the oil chamber through the translation mechanism. The piston movement will change its volume in the oil chamber, while the volume of the hydraulic oil is basically unchanged. In this way, the bellows is deformed by the force, so that the gas pressure inside it remains constant. The flow rate Q of the gas at Tr temperature (Tr is generally 23°C) is calculated by measuring the pressure p, temperature T and volume change rate dV/dt of the gas in the variable volume chamber by formula (1).

It can be seen from formula (1) that when measuring the flow rate, it is necessary not only to accurately measure the pressure, volume change rate and temperature of the gas in the variable volume chamber, but also to control the pressure of the gas in the variable volume chamber during the measurement process to keep it constant.
Hardware structure of virtual instrument
Hardware and function description:
Based on the principle of "improving measurement accuracy and automation, reducing measurement uncertainty", a measurement and control system centered on industrial computers is designed. High-precision measurement tools are selected, and multiple data acquisition cards are used to connect various measurement tools with control devices to realize automatic data acquisition and constant pressure automatic adjustment functions. The overall hardware structure is shown in Figure 1.
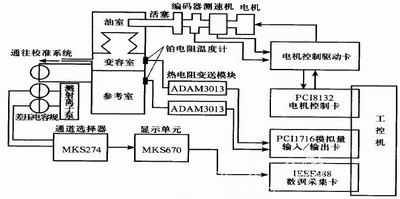
Figure 1 Overall hardware structure diagram
Three Pt100 platinum resistance temperature sensors, three ADAM3013 thermal resistance transmitter modules and one PCI-1716 multi-function data acquisition card are used to realize the simultaneous acquisition of the variable volume chamber, reference chamber and laboratory temperature. The temperature measurement range is 0~100℃, and the accuracy is 0.1℃.
A set of differential pressure capacitance film gauges (including three gauge heads, a control unit MKS274 and a data display unit MKS670, with a 488 interface on the MKS670, and the computer selects the range and gauge head through the IEEE488 data acquisition card) and an IEEE488 data acquisition card produced by NI of the United States are used to measure gas pressure. The pressure measurement range is 0 to 1.01×10⁵Pa. The
motion control card PCI-8132, servo control card and position control card, and translation mechanism (mainly including the 70LC-1 permanent magnet DC torque speed measuring unit produced by Beijing Micro Motor Factory, the HES-10242MD pulse encoder, the lead screw, and the θ5 piston) produced by Taiwan Linghua Company are used to control the speed and position of the servo motor (see Figure 2 for a schematic diagram of the servo control structure). The lead screw has a lead of 2mm and an accuracy of 0.001mm, which is the benchmark for displacement measurement.

Figure 2 Schematic diagram of servo control structure
The feedback signal of the speed loop is taken from the speed measuring generator. The filter is added to the feedback link to filter out the harmonics at low speed. The position sensing element in the position loop - the photoelectric encoder feeds back the generated electrical pulse to the position board, and after signal conditioning, it is fed to the subtraction counter in the PCI-8132. Therefore, for each pulse, the counter subtracts 1 from the target value until the content of the counter is 0, and the servo motor turns to the target position and stops rotating.
Constant pressure control principle: differential pressure capacitor film gauge, IEEE488 data acquisition card, industrial computer, 8132 motor control card, position/servo control card, motor, guide rail translation mechanism, piston, hydraulic oil and bellows together form a closed-loop control system with negative feedback constant pressure automatic regulation. During the flow measurement process, the gas pressure in the reference chamber remains unchanged. When gas flows out of the variable capacitance chamber, the pressure in the variable capacitance chamber changes, and a pressure difference △p is generated between the variable capacitance chamber and the reference chamber. The computer cyclically detects this pressure difference signal. The computer uses a preset control algorithm to calculate the corresponding motor speed adjustment according to the size of the pressure difference △p, and outputs it to the position control card, so that the motor drive card re-drives the servo motor according to the voltage signal, so that the speed of the servo motor is adjusted. The motor drives the piston to move in the oil chamber, changing the volume of the variable volume chamber, so that the differential pressure value △p between the variable volume chamber and the reference chamber is maintained near zero, so that the pressure p of the variable volume chamber remains basically constant.
System control algorithm
This system adopts a dual-mode control algorithm of time optimal (BB control) and integral separation PID control. Time optimal control can speed up the adjustment effect, while PID control ensures that the tracking accuracy and steady-state error meet the requirements. The time optimal control mode is
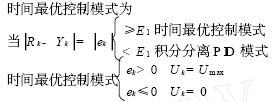
: E1 is the time optimal control deviation threshold; Rk, Yk, ek, Uk are the set value, detection value, deviation value, and computer output value at the kth sampling; Umax is the maximum value of the computer output. [page]
Integral separation PID control can enhance the anti-integral saturation function and prevent overshoot and oscillation. Its basic idea is: when the deviation is large, cancel the integral effect and only perform PD adjustment. Only when the deviation is within a certain range, the integral action is added to perform PID adjustment. The control equation can be derived as

Kp, Ki, and Kd, which are the proportional, integral, and differential coefficients of the controller respectively; E is the integral action threshold value, and its value needs to be finally determined during debugging according to the control accuracy.
Software Design and Implementation of Virtual Instruments
The system software adopts modular design, and different measurement contents can be designed into separate functional modules. The main interface program constitutes the structural framework, and each submodule completes a certain function and is called in the main interface program or other subprograms. The independence between each functional module is strong, and generally can be debugged, modified, and transplanted separately. Therefore, the entire system software has a clear hierarchy, is easy to understand, easy to modify, and is conducive to the development of new functions. The system software consists of a gas pressure data acquisition module, a temperature data acquisition module, a piston displacement data acquisition module, a motor drive and speed control module, a pressure compensation program module, and a measurement data storage and display module. Figure 3 shows the main interface of a gas microflow measurement virtual instrument developed using LabVIEW6.1. Figure 3 Uncertainty analysis
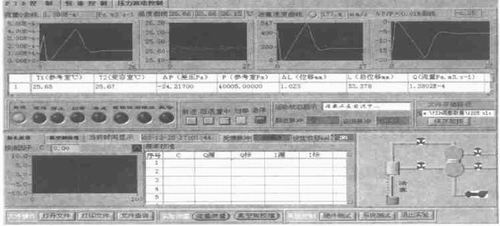
of the main interface of a gas microflow measurement virtual instrument The uncertainty of the entire instrument is synthesized by the following parts, which are now explained separately. Uncertainty of pressure measurement The pressure is measured by a capacitance film gauge. According to the calibration results of the capacitance film gauge by the Vacuum Metrology Level 1 Station of the National Defense Science and Technology Commission, the uncertainty of pressure measurement is 0.8%. The uncertainty of piston displacement and time measurement
The displacement is measured by the encoder. For every 4096 pulses output by the encoder, the piston advances 2mm, and its resolution is 0.5μm. The maximum stroke of the piston in flow measurement is 36mm (corresponding to 73728 pulses). The piston displacement is set to 73728 pulses (i.e. 36mm), and the number of pulses actually output by the measuring encoder is 73726. From the measurement results, it can be seen that the measurement uncertainty of the piston displacement is △L/L=(2×2)/(4096×36)=0.0027%. The time measurement is directly taken from the clock of the industrial computer, and its accuracy is 0.001.s. When measuring flow, the effective measurement time of flow is greater than 100s. In this way, the uncertainty of time measurement is less than 0.001%. The
measurement uncertainty of the variable volume chamber temperature The
measurement accuracy of the Pt100 platinum resistance temperature sensor is 0.1K. The temperature of the laboratory is about 23℃, so the uncertainty of temperature measurement is about 0.04%.
Constant pressure control effect
Fill the reference chamber with 104175Pa of N2, set the PID control parameters, introduce the flow into the double ball calibration system through the small hole, and perform constant pressure regulation. Figure 4 shows the PID adjustment result.

Figure 4 Constant pressure control effect diagram
From the PID adjustment result, it is known that the pressure difference between the variable volume chamber and the reference chamber is controlled to within ±0.004% of the variable volume chamber pressure. After adding the static fluctuation of the gas pressure in the reference chamber (about 0.005%), the fluctuation of the gas pressure in the variable volume chamber is about 0.0.%. From the above experimental results, it can be seen that the relative synthetic standard uncertainty of the entire flowmeter

is This uncertainty is much smaller than the design index of the flowmeter (2%).
Conclusion
In the design of this system, by selecting high-precision measuring elements and advanced measurement and control methods, the measurement accuracy of the flow rate is improved and the lower limit of the flow rate measurement is extended. The application of virtual instrument technology makes the gas micro-flow measurement system have a humanized operation interface and easy operation characteristics, and improves the automation, reliability and maintainability of the system.
Keywords:LabVIEW
Reference address:Development of Virtual Instrument for Gas Microflow Measurement Based on LabVIEW
Establishment of virtual instrument system for gas microflow measurement
The measurement principle of gas microflow The
measurement principle of gas microflow is: when the gas flows out of its variable volume chamber, the servo motor drives the piston to move horizontally in the oil chamber through the translation mechanism. The piston movement will change its volume in the oil chamber, while the volume of the hydraulic oil is basically unchanged. In this way, the bellows is deformed by the force, so that the gas pressure inside it remains constant. The flow rate Q of the gas at Tr temperature (Tr is generally 23°C) is calculated by measuring the pressure p, temperature T and volume change rate dV/dt of the gas in the variable volume chamber by formula (1).

It can be seen from formula (1) that when measuring the flow rate, it is necessary not only to accurately measure the pressure, volume change rate and temperature of the gas in the variable volume chamber, but also to control the pressure of the gas in the variable volume chamber during the measurement process to keep it constant.
Hardware structure of virtual instrument
Hardware and function description:
Based on the principle of "improving measurement accuracy and automation, reducing measurement uncertainty", a measurement and control system centered on industrial computers is designed. High-precision measurement tools are selected, and multiple data acquisition cards are used to connect various measurement tools with control devices to realize automatic data acquisition and constant pressure automatic adjustment functions. The overall hardware structure is shown in Figure 1.

Figure 1 Overall hardware structure diagram
Three Pt100 platinum resistance temperature sensors, three ADAM3013 thermal resistance transmitter modules and one PCI-1716 multi-function data acquisition card are used to realize the simultaneous acquisition of the variable volume chamber, reference chamber and laboratory temperature. The temperature measurement range is 0~100℃, and the accuracy is 0.1℃.
A set of differential pressure capacitance film gauges (including three gauge heads, a control unit MKS274 and a data display unit MKS670, with a 488 interface on the MKS670, and the computer selects the range and gauge head through the IEEE488 data acquisition card) and an IEEE488 data acquisition card produced by NI of the United States are used to measure gas pressure. The pressure measurement range is 0 to 1.01×10⁵Pa. The
motion control card PCI-8132, servo control card and position control card, and translation mechanism (mainly including the 70LC-1 permanent magnet DC torque speed measuring unit produced by Beijing Micro Motor Factory, the HES-10242MD pulse encoder, the lead screw, and the θ5 piston) produced by Taiwan Linghua Company are used to control the speed and position of the servo motor (see Figure 2 for a schematic diagram of the servo control structure). The lead screw has a lead of 2mm and an accuracy of 0.001mm, which is the benchmark for displacement measurement.

Figure 2 Schematic diagram of servo control structure
The feedback signal of the speed loop is taken from the speed measuring generator. The filter is added to the feedback link to filter out the harmonics at low speed. The position sensing element in the position loop - the photoelectric encoder feeds back the generated electrical pulse to the position board, and after signal conditioning, it is fed to the subtraction counter in the PCI-8132. Therefore, for each pulse, the counter subtracts 1 from the target value until the content of the counter is 0, and the servo motor turns to the target position and stops rotating.
Constant pressure control principle: differential pressure capacitor film gauge, IEEE488 data acquisition card, industrial computer, 8132 motor control card, position/servo control card, motor, guide rail translation mechanism, piston, hydraulic oil and bellows together form a closed-loop control system with negative feedback constant pressure automatic regulation. During the flow measurement process, the gas pressure in the reference chamber remains unchanged. When gas flows out of the variable capacitance chamber, the pressure in the variable capacitance chamber changes, and a pressure difference △p is generated between the variable capacitance chamber and the reference chamber. The computer cyclically detects this pressure difference signal. The computer uses a preset control algorithm to calculate the corresponding motor speed adjustment according to the size of the pressure difference △p, and outputs it to the position control card, so that the motor drive card re-drives the servo motor according to the voltage signal, so that the speed of the servo motor is adjusted. The motor drives the piston to move in the oil chamber, changing the volume of the variable volume chamber, so that the differential pressure value △p between the variable volume chamber and the reference chamber is maintained near zero, so that the pressure p of the variable volume chamber remains basically constant.
System control algorithm
This system adopts a dual-mode control algorithm of time optimal (BB control) and integral separation PID control. Time optimal control can speed up the adjustment effect, while PID control ensures that the tracking accuracy and steady-state error meet the requirements. The time optimal control mode is

: E1 is the time optimal control deviation threshold; Rk, Yk, ek, Uk are the set value, detection value, deviation value, and computer output value at the kth sampling; Umax is the maximum value of the computer output. [page]
Integral separation PID control can enhance the anti-integral saturation function and prevent overshoot and oscillation. Its basic idea is: when the deviation is large, cancel the integral effect and only perform PD adjustment. Only when the deviation is within a certain range, the integral action is added to perform PID adjustment. The control equation can be derived as

Kp, Ki, and Kd, which are the proportional, integral, and differential coefficients of the controller respectively; E is the integral action threshold value, and its value needs to be finally determined during debugging according to the control accuracy.
Software Design and Implementation of Virtual Instruments
The system software adopts modular design, and different measurement contents can be designed into separate functional modules. The main interface program constitutes the structural framework, and each submodule completes a certain function and is called in the main interface program or other subprograms. The independence between each functional module is strong, and generally can be debugged, modified, and transplanted separately. Therefore, the entire system software has a clear hierarchy, is easy to understand, easy to modify, and is conducive to the development of new functions. The system software consists of a gas pressure data acquisition module, a temperature data acquisition module, a piston displacement data acquisition module, a motor drive and speed control module, a pressure compensation program module, and a measurement data storage and display module. Figure 3 shows the main interface of a gas microflow measurement virtual instrument developed using LabVIEW6.1. Figure 3 Uncertainty analysis

of the main interface of a gas microflow measurement virtual instrument The uncertainty of the entire instrument is synthesized by the following parts, which are now explained separately. Uncertainty of pressure measurement The pressure is measured by a capacitance film gauge. According to the calibration results of the capacitance film gauge by the Vacuum Metrology Level 1 Station of the National Defense Science and Technology Commission, the uncertainty of pressure measurement is 0.8%. The uncertainty of piston displacement and time measurement
The displacement is measured by the encoder. For every 4096 pulses output by the encoder, the piston advances 2mm, and its resolution is 0.5μm. The maximum stroke of the piston in flow measurement is 36mm (corresponding to 73728 pulses). The piston displacement is set to 73728 pulses (i.e. 36mm), and the number of pulses actually output by the measuring encoder is 73726. From the measurement results, it can be seen that the measurement uncertainty of the piston displacement is △L/L=(2×2)/(4096×36)=0.0027%. The time measurement is directly taken from the clock of the industrial computer, and its accuracy is 0.001.s. When measuring flow, the effective measurement time of flow is greater than 100s. In this way, the uncertainty of time measurement is less than 0.001%. The
measurement uncertainty of the variable volume chamber temperature The
measurement accuracy of the Pt100 platinum resistance temperature sensor is 0.1K. The temperature of the laboratory is about 23℃, so the uncertainty of temperature measurement is about 0.04%.
Constant pressure control effect
Fill the reference chamber with 104175Pa of N2, set the PID control parameters, introduce the flow into the double ball calibration system through the small hole, and perform constant pressure regulation. Figure 4 shows the PID adjustment result.

Figure 4 Constant pressure control effect diagram
From the PID adjustment result, it is known that the pressure difference between the variable volume chamber and the reference chamber is controlled to within ±0.004% of the variable volume chamber pressure. After adding the static fluctuation of the gas pressure in the reference chamber (about 0.005%), the fluctuation of the gas pressure in the variable volume chamber is about 0.0.%. From the above experimental results, it can be seen that the relative synthetic standard uncertainty of the entire flowmeter

is This uncertainty is much smaller than the design index of the flowmeter (2%).
Conclusion
In the design of this system, by selecting high-precision measuring elements and advanced measurement and control methods, the measurement accuracy of the flow rate is improved and the lower limit of the flow rate measurement is extended. The application of virtual instrument technology makes the gas micro-flow measurement system have a humanized operation interface and easy operation characteristics, and improves the automation, reliability and maintainability of the system.
Previous article:Design of real-time data acquisition system based on NI Scope
Next article:Frequency stability measurement based on LabView virtual instrument
- Popular Resources
- Popular amplifiers
Latest Test Measurement Articles
- Keysight Technologies Helps Samsung Electronics Successfully Validate FiRa® 2.0 Safe Distance Measurement Test Case
- From probes to power supplies, Tektronix is leading the way in comprehensive innovation in power electronics testing
- Seizing the Opportunities in the Chinese Application Market: NI's Challenges and Answers
- Tektronix Launches Breakthrough Power Measurement Tools to Accelerate Innovation as Global Electrification Accelerates
- Not all oscilloscopes are created equal: Why ADCs and low noise floor matter
- Enable TekHSI high-speed interface function to accelerate the remote transmission of waveform data
- How to measure the quality of soft start thyristor
- How to use a multimeter to judge whether a soft starter is good or bad
- What are the advantages and disadvantages of non-contact temperature sensors?
MoreSelected Circuit Diagrams
MorePopular Articles
- LED chemical incompatibility test to see which chemicals LEDs can be used with
- Application of ARM9 hardware coprocessor on WinCE embedded motherboard
- What are the key points for selecting rotor flowmeter?
- LM317 high power charger circuit
- A brief analysis of Embest's application and development of embedded medical devices
- Single-phase RC protection circuit
- stm32 PVD programmable voltage monitor
- Introduction and measurement of edge trigger and level trigger of 51 single chip microcomputer
- Improved design of Linux system software shell protection technology
- What to do if the ABB robot protection device stops
MoreDaily News
- Allegro MicroSystems Introduces Advanced Magnetic and Inductive Position Sensing Solutions at Electronica 2024
- Car key in the left hand, liveness detection radar in the right hand, UWB is imperative for cars!
- After a decade of rapid development, domestic CIS has entered the market
- Aegis Dagger Battery + Thor EM-i Super Hybrid, Geely New Energy has thrown out two "king bombs"
- A brief discussion on functional safety - fault, error, and failure
- In the smart car 2.0 cycle, these core industry chains are facing major opportunities!
- The United States and Japan are developing new batteries. CATL faces challenges? How should China's new energy battery industry respond?
- Murata launches high-precision 6-axis inertial sensor for automobiles
- Ford patents pre-charge alarm to help save costs and respond to emergencies
- New real-time microcontroller system from Texas Instruments enables smarter processing in automotive and industrial applications
Guess you like
- A preliminary study of k210 - MixNo - graphical programming
- 【i.MX6ULL】Driver Development 6——Pinctrl subsystem and GPIO subsystem light up LED
- Audi A6 computer version internal structure analysis, please come and teach me
- Excellent Works of the National College Student Electronic Design Competition - Smart Car Album
- Tektronix RF Communication Laboratory Innovation Experiment Platform
- What is the use of the C language comments in the figure?
- IoT Protocol: MQTT Protocol
- The Development and Application of Wireless Video Surveillance
- PyCorder with capacitive touch matrix
- MCU Optimization

 TLE2227CDW


 京公网安备 11010802033920号