Design of a drone wildlife counting system using FOMO object detection algorithm
Source: InternetPublisher:spectrum Keywords: Data collection drones detection algorithms counting systems Updated: 2024/12/24
The role of AI in livestock and wildlife monitoring is expected to grow significantly. This project is an example of how AI can be used to track and count objects (animals or crops) in a fast and efficient manner using embedded machine learning. The tracking system uses computer vision from a drone flying over the field (scanning the surface downwards) with the camera facing downwards. The ML model will be able to detect and differentiate between the types of animals or crops and can calculate the cumulative number of each object (animal/crop) in real-time. This enables wildlife rescue teams to monitor animal/crop populations and can also be used by businesses to calculate potential revenue in the livestock and agricultural markets.
This project uses Edge Impulse's FOMO (Faster Objects, More Objects) object detection algorithm. Wildlife/livestock/asset tracking environments can be simulated and executed by selecting grayscale image patches and FOMO object detection with 2 output classes (e.g. turtle and duck). This project utilizes FOMO's fast and efficient algorithm to count objects while using a constrained microcontroller or single-board Linux-based computer such as a Raspberry Pi.
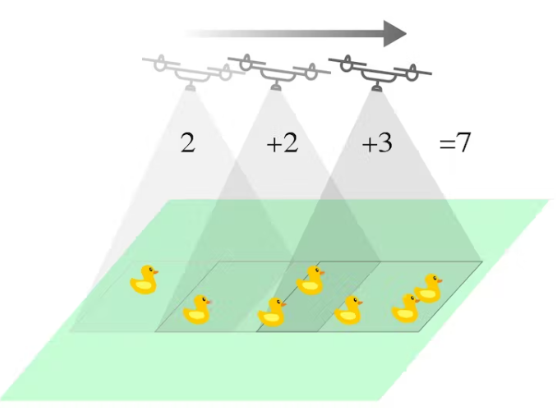
The Edge Impulse model is also implemented in our Python code so that it can cumulatively count objects. The algorithm compares the coordinates of the current frame with the previous frames; to see if there is a new object on the camera, or if the object has been counted before. In our testing, sometimes the number of objects counted is still inaccurate because the model is still in the proof-of-concept stage. However, we believe that this concept can be further developed into real-world applications.
The project consists of 5 steps:
Prepare
Data collection and labeling
Training and building models using FOMO object detection
Deploy and test object detection on a Raspberry Pi
Build a Python application to detect and count (accumulate)
Step 1: Preparation
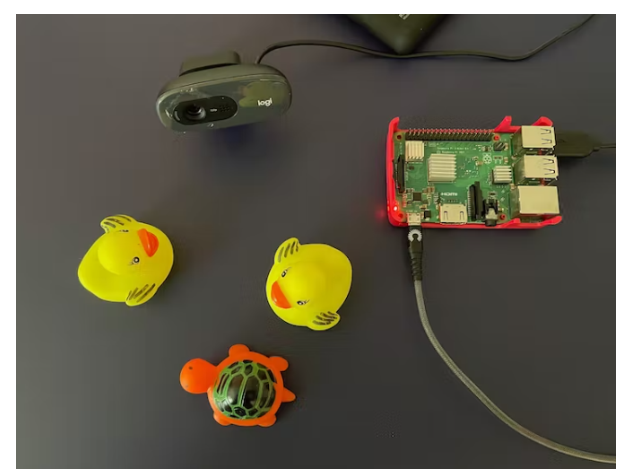
Prepare your Raspberry Pi with a newer Raspberry Pi OS (Buster or Bullseye). Then open your terminal application and ssh to your Pi.
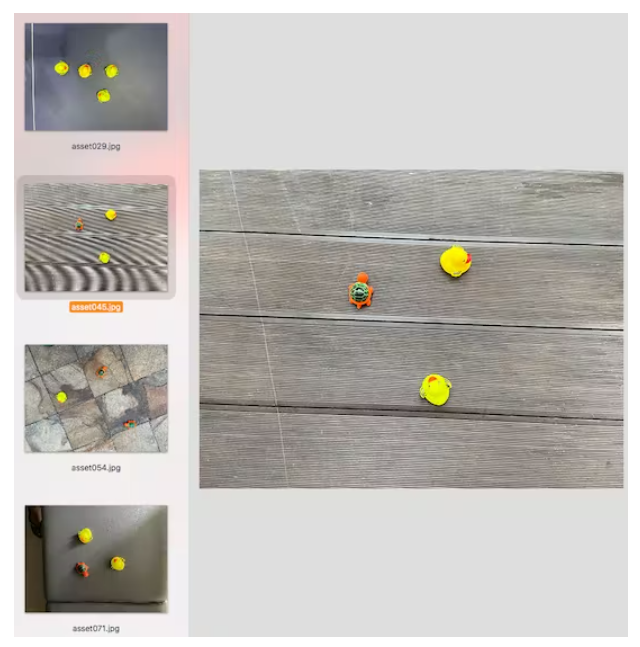
Shoot objects (such as ducks and turtles) in different positions from above with different lighting conditions to ensure that the model can work in different conditions (to prevent overfitting). In this project, I used a smartphone camera to capture images for data collection for ease of use.
Note: Try to keep the sizes of objects in the image similar; significant differences in object size will confuse the FOMO algorithm.
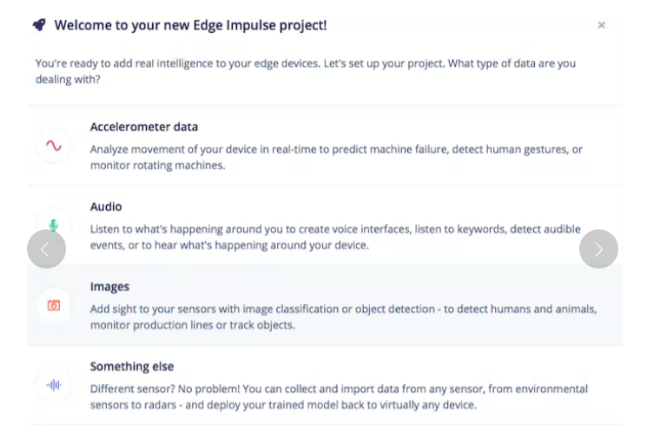
The project uses Edge Impulse as the machine learning platform, so we need to log in (create an account first), then go to Edge Impulse and create a new project.

Step 2: Data collection and labeling
Select the Image Project option and then Classify Multiple Objects.
In Dashboard > Project Info, select Bounding Boxes for the marking method and Raspberry Pi 4 for the delay calculation.

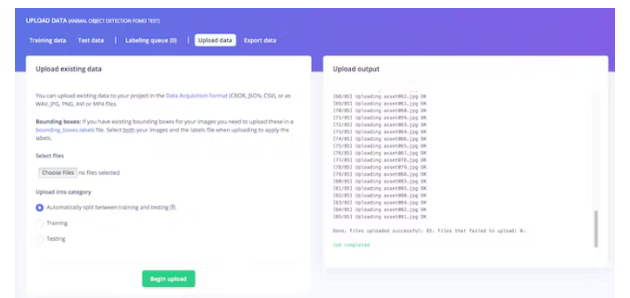
Then in Data Collection, click the Upload Data tab, select your file, choose Automatic Split, and click Start Upload.
Now, it's time to label. Click on the Label Queue tab and start dragging a box around the object and label it (Duck or Turtle) and save. Repeat until all images are labeled. Make sure the ratio between training and testing data is ideal, about 80/20.
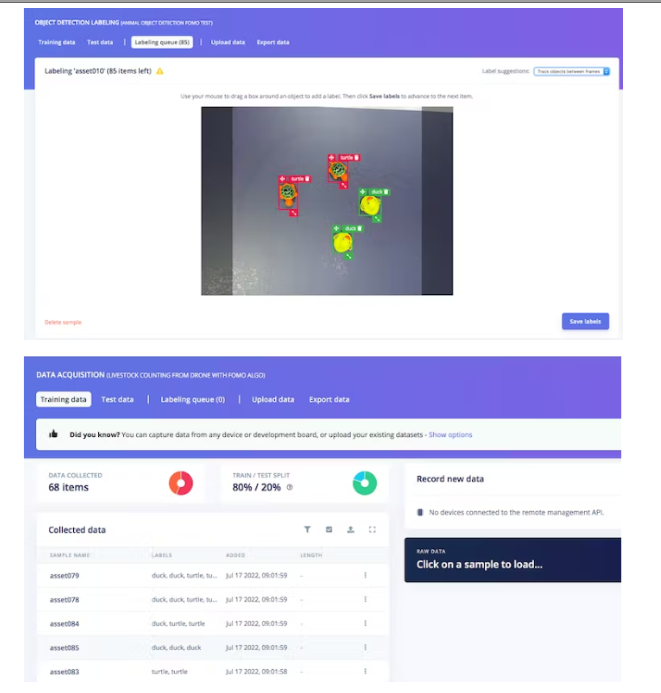
Step 3: Train and build a model using FOMO object detection
Once you have your dataset ready, go to Create Impulse and set 96 x 96 as the image width-height (this helps keep the model's memory size small). Then choose Fit Shortest Axis and select Image and Object Detection as the learning block.

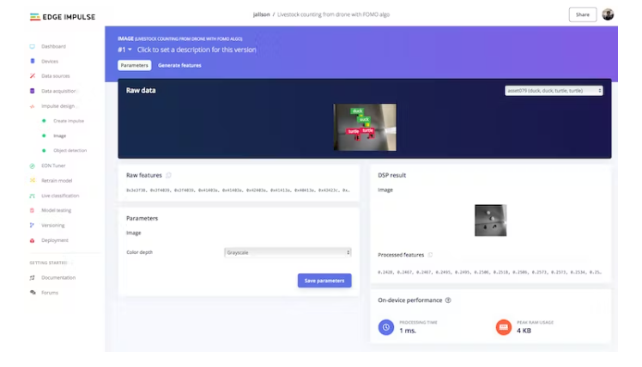
Go to the Image Parameters section, select Color Depth as Grayscale and press Save Parameters.
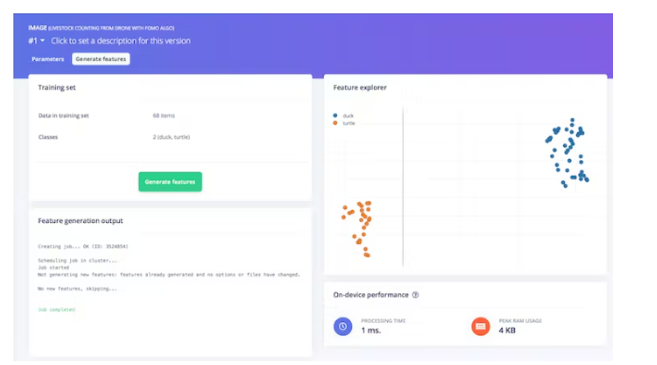
Finally, click on the Generate features button and you should get a result like the image below.
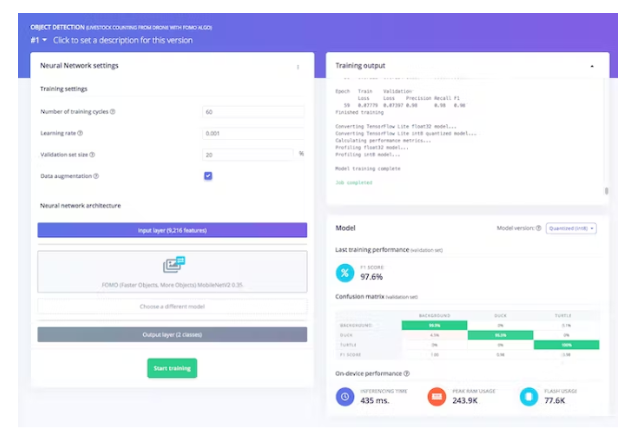
Then, navigate to the Object Detection section and keep the neural network training settings unchanged - in our case it is the Well-Balanced pre-trained model, and we choose FOMO (MobileNet V2 0.35). Train the model by pressing Start Training and you can see the progress. If everything went well, you should see something like this:
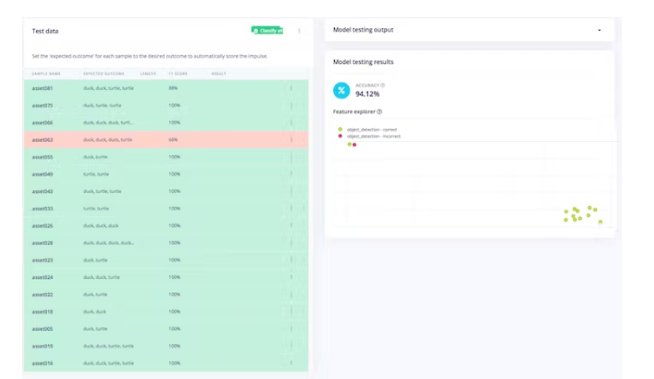
After that we can test the model, go to the Model Test section and click on All Classifications. If the accuracy result is more than 80%, then we can go to the next step - Deployment. Note: If the accuracy result is not as expected, start over with quality data, labels, or just retrain the model by changing the training epochs and learning rate settings.
Step 4: Deploy the trained model and test it on a Raspberry Pi
Now, we can switch to the Raspberry Pi. Make sure your Pi has all dependencies and Edge Impulse for Linux CLI installed (as in Step 1) and has your Pi camera (or USB webcam) connected. Then, ssh to your Pi via the terminal and type:
$ edge-impulse-linux-runner
(If you have multiple projects, add --clean ) During this process you will be asked to log in to your Edge Impulse account.
This will automatically download your model and compile it to your Pi, then begin classification. The results will be displayed in the terminal window.
You can also start the video stream on your browser : http:// Your Raspberry Pi IP address: 4912
Turtle and Duck have been successfully identified in real time (each inference time is very short) using x,y coordinates.
Prior to this step, we had already taken the data and trained an object detection model on the Edge Impulse platform and ran it locally on our Raspberry Pi board. Therefore, we can conclude that it has been successfully deployed.
Step 5: Build a Python program for detection and counting
To make this project more meaningful for a specific use case, we want it to compute the cumulative count of each type of object captured from a moving camera (via a drone). We take Edge Impulse's sample object detection program and turn it into an object tracker by solving a weighted bipartite matching problem so that the same object can be tracked across different frames. For more details , you can check out the code below.
Since we are using Python, we need to install the Python 3 Edge Impulse SDK and clone the repository from the previous Edge Impulse examples.
You will also need to download the trained model file so that the program we are running can access it. Type this to download it:
$ edge-impulse-linux-runner --download modelfile.eim
Make sure that you/our program «count_moving_ducks» is placed in the correct directory, for example:
$ cd linux-sdk-python/examples/image
Then, run the program using the following command:
$ python3 count_moving_ducks.py ~/modelfile.eim
Finally, we have successfully implemented the Edge Impulse FOMO object detection model and run the cumulative counting program locally on the Raspberry Pi. With the speed and accuracy levels we achieved, we are confident that this project can also be used on microcontrollers such as Arduino’s Nicla Vision or ESP32 CAM, and therefore more easily installed on drones.
count_moving_ducks.py:
’’’
Author: Jallson Suryo & Nicholas Patrick
Date: 2022-07-25
License: CC0
Source: Edge Impulse python SDK example file (classify.py) -- modified
Description: Program to count livestock or wildlife from a drone (moving camera) using
Edge Impulse FOMO trained model.
’’’
#!/usr/bin/env python
import device_patches # Device specific patches for Jetson Nano (needs to be before importing cv2)
from math import inf, sqrt
from queue import Queue
import cv2
import os
import sys, getopt
import signal
import time
from edge_impulse_linux.image import ImageImpulseRunner
runner = None
# if you don’t want to see a camera preview, set this to False
show_camera = True
if (sys.platform == ’linux’ and not os.environ.get(’DISPLAY’)):
show_camera = False
def now():
return round(time.time() * 1000)
def get_webcams():
port_ids = []
for port in range(5):
print("Looking for a camera in port %s:" %port)
camera = cv2.VideoCapture(port)
if camera.isOpened():
ret = camera.read()[0]
if ret:
backendName =camera.getBackendName()
w = camera.get(3)
h = camera.get(4)
print("Camera %s (%s x %s) found in port %s " %(backendName,h,w, port))
port_ids.append(port)
camera.release()
return port_ids
def sigint_handler(sig, frame):
print(’Interrupted’)
if (runner):
runner.stop()
sys.exit(0)
signal.signal(signal.SIGINT, sigint_handler)
def help():
print(’python classify.py
def main(argv):
try:
opts, args = getopt.getopt(argv, "h", ["--help"])
except getopt.GetoptError:
help()
sys.exit(2)
for opt, arg in opts:
if opt in (’-h’, ’--help’):
help()
sys.exit()
if len(args) == 0:
help()
sys.exit(2)
model = args[0]
dir_path = os.path.dirname(os.path.realpath(__file__))
modelfile = os.path.join(dir_path, model)
print(’MODEL: ’ + modelfile)
with ImageImpulseRunner(modelfile) as runner:
try:
model_info = runner.init()
print(’Loaded runner for "’ + model_info[’project’][’owner’] + ’ / ’ + model_info[’project’][’name’] + ’"’)
labels = model_info[’model_parameters’][’labels’]
if len(args)>= 2:
videoCaptureDeviceId = int(args[1])
else:
port_ids = get_webcams()
if len(port_ids) == 0:
raise Exception(’Cannot find any webcams’)
if len(args)<= 1 and len(port_ids)> 1:
raise Exception("Multiple cameras found. Add the camera port ID as a second argument to use to this script")
videoCaptureDeviceId = int(port_ids[0])
camera = cv2.VideoCapture(videoCaptureDeviceId)
ret = camera.read()[0]
if ret:
backendName = camera.getBackendName()
w = camera.get(3)
h = camera.get(4)
print("Camera %s (%s x %s) in port %s selected." %(backendName,h,w, videoCaptureDeviceId))
camera.release()
else:
raise Exception("Couldn’t initialize selected camera.")
HEIGHT = 96
WIDTH = 96
next_frame_start_time = 0
prev_frame_objects = []
cumulative_counts = {’duck’ : 0, ’turtle’ : 0}
# iterate through frames
for res, img in runner.classifier(videoCaptureDeviceId):
# print(’classification runner response’, res)
if "classification" in res["result"].keys():
print(’Result (%d ms.) ’ % (res[’timing’][’dsp’] + res[’timing’][’classification’]), end=’’)
for label in labels:
score = res[’result’][’classification’][label]
print(’%s: %.2f ’ % (label, score), end=’’)
print(’’, flush=True)
elif "bounding_boxes" in res["result"].keys():
curr_frame_objects = res["result"]["bounding_boxes"]
m, n = len(prev_frame_objects), len(curr_frame_objects)
print(’Found %d bounding boxes (%d ms.)’ % (n, res[’timing’][’dsp’] + res[’timing’][’classification’]))
# iterate through identified objects
for bb in curr_frame_objects:
print(’ %s (%.2f): x=%d y=%d w=%d h=%d’ % (bb[’label’], bb[’value’], bb[’x’], bb[’y’], bb[’width’], bb[’height’]))
img = cv2.rectangle(img, (bb[’x’], bb[’y’]), (bb[’x’] + bb[’width’], bb[’y’] + bb[’height’]), (255, 0, 0), 1)
# Pairs objects seen in both the previous frame and the current frame.
# To get a good pairing, each potential pair is given a cost. The problem
# then transforms into minimum cost maximum cardinality bipartite matching.
# populate table
def get_c(a0, a1):
# computes cost of pairs. A cost of inf implies no edge.
A, B = sqrt(HEIGHT ** 2 + WIDTH ** 2) / 8, 5
if a0[’label’] != a1[’label’]: return inf
d2 = (a0[’x’] - a1[’x’]) ** 2 + (a0[’x’] - a1[’x’]) ** 2
dn4 = d2 ** -2 if d2 else 10**20
val = a0[’value’] * a1[’value’] * (((1 + B) * dn4) / (dn4 + A ** -4) - B)
return inf if val <= 0 else 1 - val
match_c = [[get_c(i, j) for j in curr_frame_objects] for i in prev_frame_objects]
# solves the matching problem in O(V^2E) by repeatedly finding augmenting paths
# using shortest path faster algorithm (SPFA).
# A modified Hungarian algorithm could also have been used.
# 0..m-1: prev, left
# m..m+n-1: this, right
# m+n: source
# m+n+1: sink
source, sink, V = m + n, m + n + 1, m + n + 2
matched = [-1] * (m + n + 2)
adjLis = [[] for i in range(m)] + [[(sink, 0)] for _ in range(n)] + [[(i, 0) for i in range(m)], []]
# left right source sink
for i in range(m):
for j in range(n):
if match_c[i][j] != inf:
adjLis[i].append((j + m, match_c[i][j]))
# finds augmenting paths until no more are found.
while True:
# SPFA
distance = [inf] * V
distance[source] = 0
parent = [-1] * V
Q, inQ = Queue(), [False] * V
Q.put(source); inQ[source] = True
while not Q.empty():
u = Q.get(); inQ[u] = False
for v, w in adjLis[u]:
if u < m and matched[u] == v: continue
if u == source and matched[v] != -1: continue
if distance[u] + w < distance[v]:
distance[v] = distance[u] + w
parent[v] = u
if not inQ[v]: Q.put(v); inQ[v] = True
aug = parent[sink]
if aug == -1: break
# augment the shortest path
while aug != source:
v = aug
aug = parent[aug]
u = aug
aug = parent[aug]
adjLis[v] = [(u, -match_c[u][v - m])]
matched[u], matched[v] = v, u
# updating cumulative_counts by the unmatched new objects
for i in range(n):
if matched[m + i] == -1:
cumulative_counts[curr_frame_objects[i][’label’]] += 1
# preparing prev_frame_objects for the next frame
next_prev_frame_objects = curr_frame_objects
# considering objects that became invisible (false negative) for a few frames.
for i in range(m):
if matched[i] != -1: continue
prev_frame_objects[i][’value’] *= 0.7
if prev_frame_objects[i][’value’] >= 0.35:
next_prev_frame_objects.append(prev_frame_objects[i])
prev_frame_objects = next_prev_frame_objects
print("current cumulative_counts: %d ducks, %d turtles" % (cumulative_counts[’duck’], cumulative_counts[’turtle’]))
if (show_camera):
cv2.imshow(’edgeimpulse’, cv2.cvtColor(img, cv2.COLOR_RGB2BGR))
if cv2.waitKey(1) == ord(’q’):
break
if (next_frame_start_time > now()):
time.sleep((next_frame_start_time - now()) / 1000)
# operates at a maximum of 5fps
next_frame_start_time = now() + 200
finally:
if (runner):
runner.stop()
if __name__ == "__main__":
main(sys.argv[1:])
- How to build a light source that adjusts its brightness based on atmospheric conditions
- Share a solar beacon circuit
- Using BMP280 to make a weather station
- How to Design a Solar Cellular Weather Station Using Particle Boron
- Design of a tomato sorting machine based on Raspberry Pi
- A simple memory reader/writer
- Electronic Rat Killer Circuit
- Electronic fly killer
- Working Principle and Production of TV Scanning Demonstrator
- Input and output polarity reversal circuit composed of MAX660
- Hardware circuit design of UAV remote sensing platform control system
- How does an optocoupler work? Introduction to the working principle and function of optocoupler
- 8050 transistor pin diagram and functions
- What is the circuit diagram of a TV power supply and how to repair it?
- Analyze common refrigerator control circuit diagrams and easily understand the working principle of refrigerators
- Hemisphere induction cooker circuit diagram, what you want is here
- Circuit design of mobile phone anti-theft alarm system using C8051F330 - alarm circuit diagram | alarm circuit diagram
- Humidity controller circuit design using NAND gate CD4011-humidity sensitive circuit
- Electronic sound-imitating mouse repellent circuit design - consumer electronics circuit diagram
- Three-digit display capacitance test meter circuit module design - photoelectric display circuit


 京公网安备 11010802033920号