Laser triangulation diffuse reflection displacement sensor has obvious advantages in thickness measurement:
- Very small measurement spot, which is the spot light area. For example, the spot area of ZLDS10X series of Zhenshangyou Company is about 1mm. Compared with area-type non-contact capacitance and eddy current sensors, it has almost no requirements on the area of the measured object and is suitable for measuring the thickness of very small area size;
- Farther measuring range starting distance. It is much larger than the starting distance of non-contact capacitance and eddy current sensors. For example, the measuring range of ZLDS100 laser displacement sensor of Zhenshangyou Company is 100mm, and the measuring distance can reach 1000mm. In this way, the sensor can be far away from the measured object, avoiding damage and thermal radiation of the measured object;
- It has a large measuring range. For example, the measuring range of ZLDS101 laser displacement sensor of Zhenyou Company reaches 2000mm, which is difficult for other sensors to achieve.
- It has nothing to do with the material of the object being measured, that is, metal and non-metal objects, non-transparent surfaces with diffuse reflection conditions can be measured.
Like other sensors, the following conditions must be taken into consideration to achieve accurate thickness measurement, otherwise even the best sensors will not be able to measure accurately:
1. Use a single laser displacement sensor to measure thickness
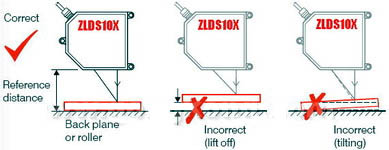
The object to be measured is placed on the measuring platform, the distance from the sensor to the platform surface is measured, and then the distance from the sensor to the surface of the object to be measured is measured, and the thickness is measured after calculation. It is required that there is no air gap between the object to be measured and the measuring platform, and the object to be measured has no warping. These strict requirements can only be achieved offline.
2. Dual laser sensors for thickness measurement
A laser displacement sensor is installed above and below the object to be measured. The thickness of the object to be measured is D=C-(A+B). Among them, C is the distance between the two sensors, A is the distance between the upper sensor and the object to be measured, and B is the distance between the lower sensor and the object to be measured. In the figure: SMR refers to the starting distance of the sensor range, and MR refers to the sensor range.
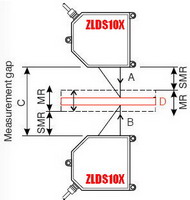
The advantage of this method for online thickness measurement is that it can eliminate the influence of the vibration of the measured object on the measurement result. However, it also has requirements for the installation and performance of the sensor.
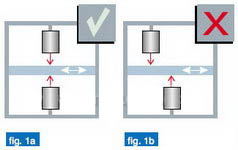
The conditions to ensure measurement accuracy are: the two sensors must emit coaxial light beams, and the two sensors must scan synchronously (see the attached figure in this article). Coaxiality is achieved by installation, while synchronization depends on the selection of laser sensors with synchronization ends. For example, the ZLDS10X series laser displacement sensors all have synchronization ends.
Synchronous working diagram:
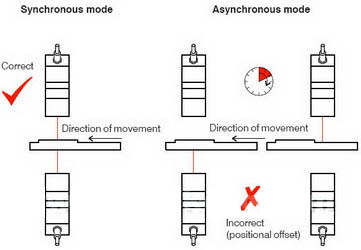
Asynchrony will cause large errors: if the object being measured has a vibration frequency of 20HZ and an amplitude of 1mm, if the signal is asynchronous and delayed by 1ms, it will cause an error of 125µm.
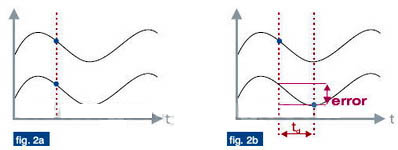
Schematic diagram of installing two laser coaxial cables:
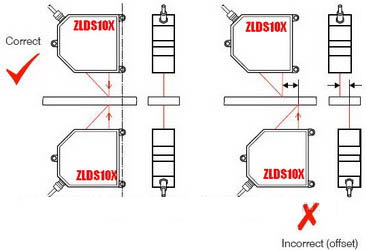
The installation makes the two lasers coaxial, which not only ensures the thickness of the object at the same position, but also reduces the error caused by the tilt of the object. For example, when the moving direction of the object is different from the axis, when the axis is different by 1mm, the tilt of the object by 2° can cause an error of 35µm.
Previous article:Technical principle and application of an embedded instrument DCS system
Next article:Design and implementation of HART intelligent instrument online monitoring system
- Molex leverages SAP solutions to drive smart supply chain collaboration
- Pickering Launches New Future-Proof PXIe Single-Slot Controller for High-Performance Test and Measurement Applications
- CGD and Qorvo to jointly revolutionize motor control solutions
- Advanced gameplay, Harting takes your PCB board connection to a new level!
- Nidec Intelligent Motion is the first to launch an electric clutch ECU for two-wheeled vehicles
- Bosch and Tsinghua University renew cooperation agreement on artificial intelligence research to jointly promote the development of artificial intelligence in the industrial field
- GigaDevice unveils new MCU products, deeply unlocking industrial application scenarios with diversified products and solutions
- Advantech: Investing in Edge AI Innovation to Drive an Intelligent Future
- CGD and QORVO will revolutionize motor control solutions
- Innolux's intelligent steer-by-wire solution makes cars smarter and safer
- 8051 MCU - Parity Check
- How to efficiently balance the sensitivity of tactile sensing interfaces
- What should I do if the servo motor shakes? What causes the servo motor to shake quickly?
- 【Brushless Motor】Analysis of three-phase BLDC motor and sharing of two popular development boards
- Midea Industrial Technology's subsidiaries Clou Electronics and Hekang New Energy jointly appeared at the Munich Battery Energy Storage Exhibition and Solar Energy Exhibition
- Guoxin Sichen | Application of ferroelectric memory PB85RS2MC in power battery management, with a capacity of 2M
- Analysis of common faults of frequency converter
- In a head-on competition with Qualcomm, what kind of cockpit products has Intel come up with?
- Dalian Rongke's all-vanadium liquid flow battery energy storage equipment industrialization project has entered the sprint stage before production
- Allegro MicroSystems Introduces Advanced Magnetic and Inductive Position Sensing Solutions at Electronica 2024
- Car key in the left hand, liveness detection radar in the right hand, UWB is imperative for cars!
- After a decade of rapid development, domestic CIS has entered the market
- Aegis Dagger Battery + Thor EM-i Super Hybrid, Geely New Energy has thrown out two "king bombs"
- A brief discussion on functional safety - fault, error, and failure
- In the smart car 2.0 cycle, these core industry chains are facing major opportunities!
- The United States and Japan are developing new batteries. CATL faces challenges? How should China's new energy battery industry respond?
- Murata launches high-precision 6-axis inertial sensor for automobiles
- Ford patents pre-charge alarm to help save costs and respond to emergencies
- New real-time microcontroller system from Texas Instruments enables smarter processing in automotive and industrial applications
- The last week of 2020 review information~
- The problem of starting success rate of sensorless BLDC motor
- Electric Vehicle Electric Drive Theory and Design (2nd Edition)
- The document issued by the Ministry of Industry and Information Technology is expected to drive new demand for new energy vehicle related testing instruments
- Chengdu is raging again. When will it end?
- CircuitPython Application Menu Launcher
- Tektronix Jianghu Ling: Complaining and sharing the development of USB Type-C, collecting energy and growing together
- 【Iprober 520 Current Probe】Evaluation Report (I) Principle Specifications and Preliminary Impressions
- 【Silicon Labs BG22-EK4108A Bluetooth Development Review】 3. LED flashing
- Modified +2A boost board circuit analysis

 Multi-function level program
 USB Complete The Developer\'s Guide 5ed (USB Development Complete 5th Edition)


 京公网安备 11010802033920号