There are many methods to measure rotor speed, but most of them are relatively complicated. At present, there are four main methods to measure rotation speed: mechanical, electromagnetic, photoelectric and laser. The mechanical method mainly uses the principle of centrifugal force. A fixed mass hammer that rotates with the shaft drives the free sleeve to move up and down. The measurement results are obtained according to different sleeve positions corresponding to different speeds. The principle is simple and direct, and no additional electrical equipment is required. It is suitable for contact speed measurement occasions with low accuracy requirements. The electromagnetic system consists of an electromagnetic sensor and a toothed disc installed on the shaft. The rotation of the main shaft drives the toothed disc to rotate. When the teeth pass through the sensor, the magnetic resistance of the circuit changes. After amplification and shaping, a pulse is formed, and the speed value is obtained through the pulse. Due to the limitations of the toothed disc processing accuracy, the minimum resolution interval of the teeth, and the maximum counting frequency of the circuit, the measurement accuracy cannot be guaranteed. The photoelectric structure is similar to the electromagnetic structure. The rotating toothed disc is replaced by a photoelectric encoder or a black and white reflective stripe, and the electromagnetic sensor is replaced by a photoelectric receiver. The measurement result is obtained by counting the reflected light pulse signal. Due to the limitations of the minimum resolution interval of the stripes and the maximum counting frequency of the circuit, the measurement accuracy cannot be guaranteed. The measured speed value is the average value of the interval between two counting pulses, just like the electromagnetic type. Laser velocimetry (LDV) is a developing speed measurement technology. It obtains the instantaneous angular velocity of the rotating body through the laser Doppler effect. In theory, it has a very high instantaneous speed measurement accuracy, but the actual product accuracy is not high enough and the price is expensive, which is limited in practical use. By improving the existing electromagnetic sensor, a new sensor suitable for instantaneous speed measurement is designed, which has certain practical significance in the instantaneous state analysis of rotating machinery.
Based on the traditional electromagnetic system, this paper develops a new speed measuring instrument using infrared radiation technology. It is easy to install, has low requirements on the surrounding environment, and can easily complete the speed measurement. It has a wide dynamic measurement range and high measurement accuracy.
2 System Design
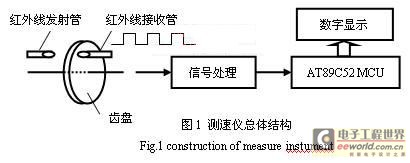
The overall structure of the speed measurement system is shown in Figure 1, which mainly includes an infrared speed sensor (composed of infrared transmitting and receiving circuits and toothed discs), a signal processing circuit, a single-chip microcomputer, and a digital display part. The working process is as follows: when the toothed disc rotates, the infrared light path between the infrared transmitting tube and the receiving tube is intermittent due to the shielding of the gear teeth. The signal processing circuit converts this changing light signal into an electrical pulse signal. One pulse signal means that the toothed disc rotates one tooth. The single-chip microcomputer counts the pulses and uses its internal timer to count the number of pulses received. The rotation speed of the toothed disc can be calculated based on the number of pulses and the time used. Finally, the rotation speed is displayed through the digital display part.
2.1 System Hardware Design
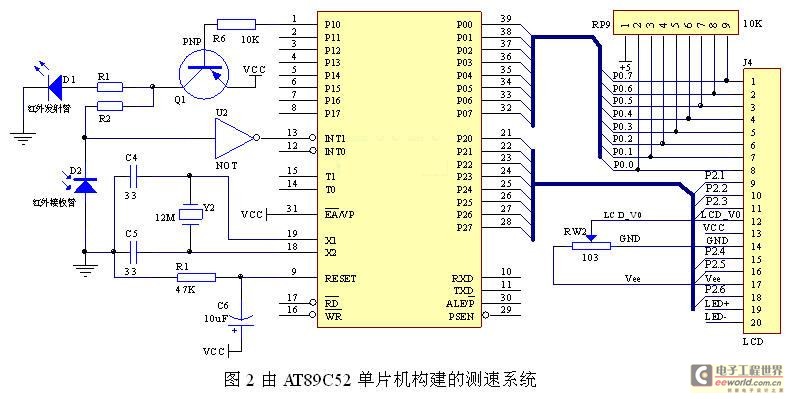
According to the principle of infrared speed measurement, the circuit design of the system is shown in Figure 2.
This system uses the AT89C52 microcontroller, which is a low-voltage, high-performance CMOS 8-bit microcontroller produced by ATMEL, USA. It contains 8KB of repeatedly erasable Flash program memory and 256B of random access memory (RAM). The device is produced using ATMEL's high-density, non-volatile storage technology, and is pin-compatible with the standard MS-51 instruction system and 8052 products. It has an 8-bit central processing unit (CPU) built into the chip. The powerful AT89C52 microcontroller is suitable for many more complex control applications.
Infrared photosensitive diodes are selected as light-receiving devices in the circuit. Together with infrared light-emitting diodes, they form a pair of infrared transmitting and receiving tubes. The infrared photosensitive diodes are in the reverse working state in the circuit. When there is no light irradiation, the photosensitive diode is in the cut-off state, the reverse resistance is large, and the reverse current (dark current) is small. As the light increases, the photosensitive diode is in the on state, its reverse resistance decreases, and the reverse current (photocurrent) increases. There is a linear relationship between its photocurrent and illumination.
The speed display uses the character liquid crystal display module (LCM) JHD12864, which can display 16×8 or 16×16 dot matrix characters. Its main control drive circuit is HD44780, which has standard interface characteristics and is compatible with the operation timing of the M6800 series and MCS-51 series MCUs; the module has 64 bytes of custom character RAM inside, which can customize the display characters. The module is powered by a +5V power supply and has a total of 20 pins. Its interface with the microcontroller is shown in Figure 2, where the variable resistor RW2 is used to adjust the contrast of the display.
3.2 System software design
3.2.1 Selection of timing schemes
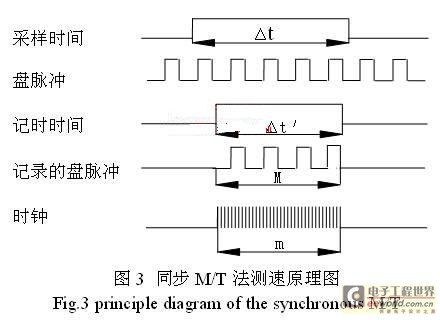
According to different timing schemes, the timing methods of digital speed measurement devices currently include M method, T method and synchronous M/T method. The M method speed measurement is to read the number of pulses M within an equal time interval △t, and calculate the speed by M/△t. The higher the speed, the more M is counted within the △t time, and the speed measurement error caused by ±1 counting pulse error is smaller, so this method is suitable for high speed. The T method of speed measurement calculates the speed based on the clock pulse count value m corresponding to the time interval between two adjacent pulses. The slower the speed or the more pulses per revolution, the more count value m, and the smaller the error caused by the counter ±l count pulses. Therefore, this method is suitable for low speed. The absolute error measured by the above two methods is inversely proportional to the speed sampling time T (Hp: time interval △t or count value m). Therefore, in the case of steady-state measurement and low real-time requirements, a larger T can be taken to ensure sufficient measurement accuracy. However, in dynamic measurement and real-time control systems, there are often higher requirements for the real-time performance of speed measurement. Therefore, the sampling time T cannot be arbitrarily large. In order to solve the contradiction between a small cycle and high speed measurement accuracy, the synchronous M/T method can be used. The characteristic of this method is that the timing time △t' is not fixed, and it is based on the recording of complete disk pulses. The main purpose is to try to synchronize M with △t'. The timing starts from an integer number of disk pulses and ends at an integer number of disk pulses. What is recorded is an integer number of disk pulses, and it is "synchronized" with the timing. The principle is shown in Figure 3. In the sampling time △t, the actual timing time △t' starts at the falling edge of the first disk pulse and ends at the falling edge of the last pulse, thus obtaining an integer number of disk pulses, eliminating the error introduced by ±1 pulse in the M method and T method. In view of the comparison of several methods, the synchronous M/T method is used in the design of this speed measurement system.
[page]
3.2.2 Software structure division
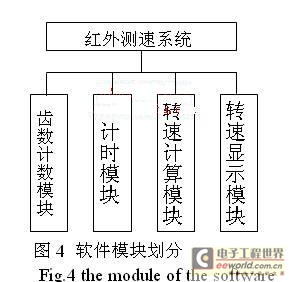
The structured software design method is used to make the design simple, easy to debug and transplant, and improve programming efficiency. The system software is divided into four modules as shown in Figure 4 using the structured software design method: tooth number counting module, timing module, speed calculation module and speed display module. The most important ones are the timing module and the speed calculation module.
(1) Timing module
As shown in Figure 2, when the infrared light emitted by the infrared emitting tube is not blocked by the gear teeth, the receiving tube is in the on state when exposed to the infrared light, and the voltage input to the interrupt port of the microcontroller through the inverter is high, and no interruption occurs; when the infrared light emitted by the infrared emitting tube is blocked by the gear teeth, the receiving tube is not exposed to the infrared light and is in the off state, and the voltage input to the interrupt port of the microcontroller through the inverter jumps to a low level. Thus, the interrupt program is activated to count the pulses. The counting flow chart is shown in Figure 5. Since the counting needs to be synchronized with the timing, the timer needs to be turned on when the first infrared light is blocked (Pass=0 when the infrared light is blocked, otherwise Pass=1), that is, when the interrupt port potential changes from high to low. Since the gear wheel in the experiment has a total of 108 teeth, in order to improve the real-time measurement, the 108 teeth are divided into 9 equal parts. When the count value (Num) is 12, the timer is turned off and the timing value of the timer is read.
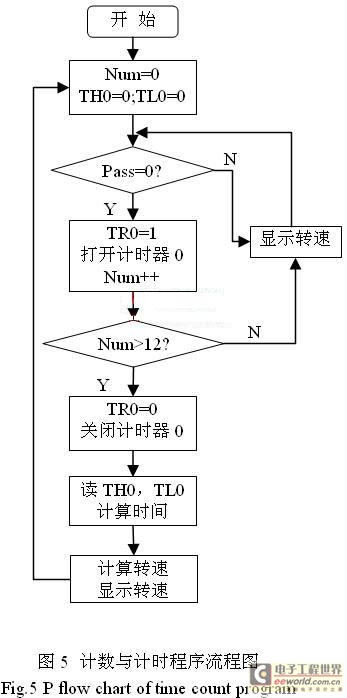
(2) Speed calculation module
Since the system uses the synchronous M/T method to measure the speed, the parameters required for calculating the speed are the number of disk pulses and the timing value. In this system, the AT89C52 microcontroller uses an external crystal oscillator with a frequency of 12MHz, so each machine cycle is 1us. The counting pulse cycle of the microcontroller timer is one machine cycle. If the timer counts from zero when it is turned on and its count value is m when the timer is turned off, the timing time is m microseconds. The speed calculation part of the program is as follows.
m=TH0×256 //Read the counter count variable TH0 and shift it left by 8 bits
m=TH0+TL0 //Get the number of clock pulses
time=m //Calculate the timing time
n=60*106/(9*time) //Calculate the speed r/min
5 Conclusion
The innovation of the author of this article is to replace the traditional electromagnetic sensor with an infrared sensor. The hardware circuit of the system is simple, the speed measurement range is wide, and it has high measurement accuracy. It also has a fairly high accuracy for low speed measurement. It also makes full use of the internal resources of the microcontroller and has a high cost performance. It can be used for non-contact detection and control of rotation speed in various industries.
Previous article:Design of a high-precision temperature measurement device based on single-chip microcomputer
Next article:Design of a power supply for automobile solenoid valve quality test based on single chip microcomputer
- Popular Resources
- Popular amplifiers
 Professor at Beihang University, dedicated to promoting microcontrollers and embedded systems for over 20 years.
- Innolux's intelligent steer-by-wire solution makes cars smarter and safer
- 8051 MCU - Parity Check
- How to efficiently balance the sensitivity of tactile sensing interfaces
- What should I do if the servo motor shakes? What causes the servo motor to shake quickly?
- 【Brushless Motor】Analysis of three-phase BLDC motor and sharing of two popular development boards
- Midea Industrial Technology's subsidiaries Clou Electronics and Hekang New Energy jointly appeared at the Munich Battery Energy Storage Exhibition and Solar Energy Exhibition
- Guoxin Sichen | Application of ferroelectric memory PB85RS2MC in power battery management, with a capacity of 2M
- Analysis of common faults of frequency converter
- In a head-on competition with Qualcomm, what kind of cockpit products has Intel come up with?
- Dalian Rongke's all-vanadium liquid flow battery energy storage equipment industrialization project has entered the sprint stage before production
- Allegro MicroSystems Introduces Advanced Magnetic and Inductive Position Sensing Solutions at Electronica 2024
- Car key in the left hand, liveness detection radar in the right hand, UWB is imperative for cars!
- After a decade of rapid development, domestic CIS has entered the market
- Aegis Dagger Battery + Thor EM-i Super Hybrid, Geely New Energy has thrown out two "king bombs"
- A brief discussion on functional safety - fault, error, and failure
- In the smart car 2.0 cycle, these core industry chains are facing major opportunities!
- The United States and Japan are developing new batteries. CATL faces challenges? How should China's new energy battery industry respond?
- Murata launches high-precision 6-axis inertial sensor for automobiles
- Ford patents pre-charge alarm to help save costs and respond to emergencies
- New real-time microcontroller system from Texas Instruments enables smarter processing in automotive and industrial applications
- Thoughts and feelings after experiencing a domestic USB audio chip
- [2022 Digi-Key Innovation Design Competition] [Intelligent Garden Integrated Control System] Data Collection STM32L496G-DISCO
- Voltech pm1000+PC software (host computer software)
- Embedded vision engine and DSP library expand TI driver assistance system
- MSP430 main system clock and 430 low power settings
- Analysis of C64x+ CACHE consistency issues
- Don’t all design applications require 5G?
- Digital tube decreasing display and running light control (beginner level) [including Proteus simulation and source code]
- Instructions for purchasing the CC1352R1 wireless development board on TI.com
- Waveform Generator Circuit

 Real-time driver monitoring system via modal and viewpoint analysis
 CVPR 2023 Paper Summary: Adversarial Attack and Defense


 京公网安备 11010802033920号