In the power relay protection system, phase measurement is a regular item. From the perspective of the traditional "zero-crossing" method, to measure the phase angle of two AC signals, the usual practice is to amplify and shape the two AC signals into square waves that change at the zero-crossing point, and at the same time compare them in a loop to measure the phase difference (Δtx) of the same-frequency signals. However, there are often many signals that need to be connected for field measurement, which can easily cause wiring errors. In addition, when measuring the phase of the line, there are multiple loop signals connected to the equipment. If there is a wiring error on site, or there is a problem with the isolation between the channels inside the instrument, it is easy to cause a short circuit between the loops, leading to an accident.
Based on the above situation, the traditional measurement method must be changed in principle to meet the needs of the test process.
Indirect measurement method and structure synchronized with optical signals
This design adopts an indirect measurement method that does not require the introduction of two field AC signals into the same device, that is, the measurement process is performed independently in the loops of each signal. The condition of this indirect measurement method is that there must be a synchronization signal as a measurement reference, so that a correlation can be established between the measurement loops of each independent loop, so that Δtx and T0 can be measured in the end. Here, the method of synchronous phase measurement using infrared light signals is adopted. The light signal is used as the synchronous signal source. It can be synchronized without the connection relationship in the circuit. At the same time, it can also be used as a carrier for data communication.
This system includes a host and several measuring components. The host is the core part of the system, and the number of measuring components depends on the actual measurement needs (for example, when measuring a hexagonal figure, there should be 6 measuring components). The host is composed of the AT89C51 microcontroller of the MCS-51 series, and the peripheral circuit is relatively simple. It mainly relies on an optical transmitter and an optical receiver to form a communication interface. The output end of the microcontroller is driven by an inverter to control the optical transmitter to send a modulated optical signal to the measuring component. The input of the microcontroller is directly connected to the optical receiver. The optical receiver demodulates the modulated optical signal sent by the measuring component, and the microcontroller can recognize the coded signal through the program. The optical transmitter is mainly used to start the measurement process, while the optical receiver realizes data communication between the host and the measuring component.
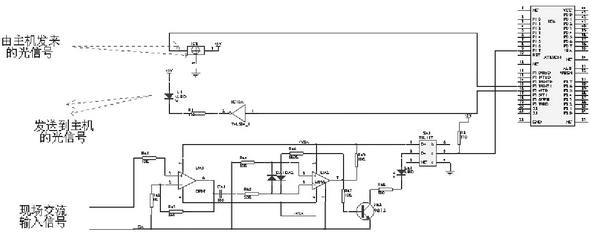
Each measuring component is also an intelligent measuring circuit with AT89C51 microcontroller as the core, and its peripheral parts mainly include optical transmitter, optical receiver and measuring circuit (as shown in Figure 1). The measuring circuit is composed of an amplifier circuit composed of OP07 and a shaping circuit composed of LM311. Its main function is to convert the AC signal into a corresponding square wave signal. The output of the square wave is connected to the I/O line of the microcontroller. Using the timer/counter inside the microcontroller, the relevant time value can be measured, and then the phase angle can be calculated. The role of the optical transmitter and optical receiver is mainly to achieve measurement and complete two-way communication with the host.

Figure 1 Circuit principle block diagram of the measuring component
Principle of indirect measurement method
On the one hand, the host controls the measurement process and sends infrared light synchronization signals to each measuring component to start the measurement. On the other hand, after each component completes the measurement, the measurement data of each component is summarized to the host through infrared light communication, and then calculated to determine the measured parameters, that is, the indirect measurement method of introducing three-dimensional variables replaces the direct measurement method. This indirect measurement method no longer requires direct measurement of the time difference. It only needs to establish the time relationship between each parameter and the optical synchronization signal, and then calculate the time difference. The loop no longer needs to be connected on the circuit, and only one optical synchronization signal can indirectly measure the phase relationship between multiple measurement loop parameters.
The advantage of this method is that each measurement loop no longer needs to be connected to the reference point. The loops are relatively independent, and the time difference between the zero-crossing moment of each AC signal and the optical synchronization signal is measured respectively as the basic parameter of phase measurement. The association between them is not based on the connection in the form of circuit, but on the optical signal, so that the short circuit between the loops can be eliminated. In addition, the connection of the instrument can be reduced. In addition to being a synchronization signal, the optical signal is also used as a data transmission channel. Each measurement loop transmits the measurement data through light transmission and concentrates it in the host part to finally complete the numerical display of the parameter.
The working process
starts at a measurement cycle. The host controls the optical transmitter to send a synchronous infrared light signal. The optical receivers of the measurement components can receive this signal at the same time. The single-chip computers of each measurement component will start their own measurement process at the same time. After completing the measurement process, the single-chip computers of each component will transmit the measurement data back to the host in turn. The host single-chip computer receives the data of each measurement component in turn through the optical receiving head and summarizes these basic data. Finally, after calculation, the host displays the corresponding digital value, thus completing a measurement cycle. In the first stage
of the host part
, the host optical transmitter sends out a synchronous optical signal to start each measuring component and enter the measurement state at the same time. At this time, the P3.4/T0 pin of the single-chip computer is set to the output state. When working, a modulation signal will be generated, which will drive the photoelectric transmitter through the inverter 74LS04. According to the program agreement, this signal is an optical signal indicating "start", that is, the synchronization signal for starting measurement is transmitted to each measuring component through this optical signal.
In the second stage, each measuring component enters the measurement at the same time. After the measurement is completed, each component transmits the measurement data back to the host in turn. The host measures and recognizes the pulse of the P3.3/INT1 pin, and determines the signal sent by the measuring component through decoding, completing the work of "retrieving data". [page] The circuit structure of each measuring component in
the measurement part
is shown in Figure 1, in which the part mainly composed of UA1 (OP07) is a signal amplifier. For example, when the clamp current is used as the measurement of the current signal, the input electrical signal is generally small and must be amplified. The part mainly composed of UA2 (LM331) is the zero-crossing comparison circuit, which is mainly used to convert the signal into a square wave with zero-crossing changes. The rising edge of this square wave indicates the zero-crossing point of the AC signal. Figure 1 also includes the photocoupler SA1 (TIL117), which isolates the circuit on the one hand, and converts the square wave signal into a TTL level for measurement on the P3.2 (INT0) of the microcontroller. This pin is set to the input state, and the rising (or falling) edge of the square wave signal can be easily measured using software. Compared with the existing circuit, its measurement part is much simpler. The traditional circuit processes the AC signals of the two loops - that is, the zero-crossing points of the two signals are directly compared in one device to determine the phase difference (Δtx). However, this circuit is no longer based on direct comparison between the two signals, and the measurement method has also changed greatly. It uses a common optical pulse as the measurement synchronization signal.
After the measurement is completed, the P3.4/T0 pin of the microcontroller of the measuring component outputs the switch signal, which drives the photoelectric transmitter through the inverter 74LS04, and then transmits the measurement data of each measuring component to the host through the optical signal. Since each measuring component is numbered, the working procedures of each measuring component will send data to the host in sequence according to its own serial number. The
working timing
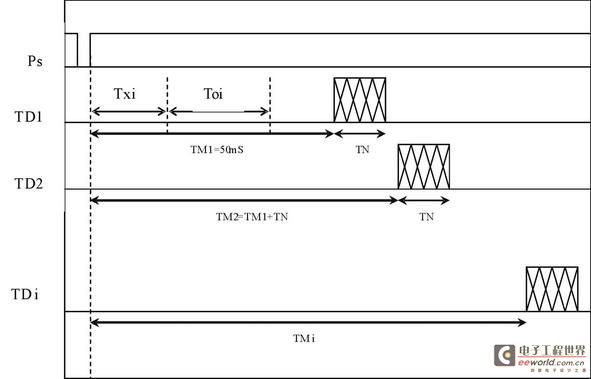
diagram 2 describes the timing relationship of data communication. When the optical receiver output signal has a falling edge (i.e. Ps=0), it means that the signal from the host is received. The timing starts when the rising edge arrives, and the subsequent data transmission is also based on this rising edge as a reference standard. The measurement time Txi +T0i and Txj+T0j are not greater than 40ms. For the first measuring component, after the synchronization signal starts the measurement, the data can be transmitted after a delay of TM1≥Txi +T0i. For reliability, this design takes TM1=50ms as the delay time of the measurement process. Assuming that the time for each data transmission is TN, the delay of the second measuring component to transmit data is the first delay time plus TN, that is: TM2= TM1+TN, and the calculation of the subsequent delay TM is similar.
According to this process, the host will save the measurement data of each part in its internal storage area in sequence for subsequent calculation and display.

Figure 2 Timing relationship of data communication
Conclusion
This indirect measurement method is an improvement on the traditional measurement method. The optical signal is introduced into the measurement process as a reference, and the final parameter data is obtained by relying on the computer's control, storage, calculation and processing functions. Since this method relies on optical signals as synchronization and data transmission, multiple measurement loops no longer need to be directly connected in the circuit, but are carried out independently, which is very useful for solving practical problems.
Reference address:Phase measurement method based on optical signal synchronization
Based on the above situation, the traditional measurement method must be changed in principle to meet the needs of the test process.
Indirect measurement method and structure synchronized with optical signals
This design adopts an indirect measurement method that does not require the introduction of two field AC signals into the same device, that is, the measurement process is performed independently in the loops of each signal. The condition of this indirect measurement method is that there must be a synchronization signal as a measurement reference, so that a correlation can be established between the measurement loops of each independent loop, so that Δtx and T0 can be measured in the end. Here, the method of synchronous phase measurement using infrared light signals is adopted. The light signal is used as the synchronous signal source. It can be synchronized without the connection relationship in the circuit. At the same time, it can also be used as a carrier for data communication.
This system includes a host and several measuring components. The host is the core part of the system, and the number of measuring components depends on the actual measurement needs (for example, when measuring a hexagonal figure, there should be 6 measuring components). The host is composed of the AT89C51 microcontroller of the MCS-51 series, and the peripheral circuit is relatively simple. It mainly relies on an optical transmitter and an optical receiver to form a communication interface. The output end of the microcontroller is driven by an inverter to control the optical transmitter to send a modulated optical signal to the measuring component. The input of the microcontroller is directly connected to the optical receiver. The optical receiver demodulates the modulated optical signal sent by the measuring component, and the microcontroller can recognize the coded signal through the program. The optical transmitter is mainly used to start the measurement process, while the optical receiver realizes data communication between the host and the measuring component.
Each measuring component is also an intelligent measuring circuit with AT89C51 microcontroller as the core, and its peripheral parts mainly include optical transmitter, optical receiver and measuring circuit (as shown in Figure 1). The measuring circuit is composed of an amplifier circuit composed of OP07 and a shaping circuit composed of LM311. Its main function is to convert the AC signal into a corresponding square wave signal. The output of the square wave is connected to the I/O line of the microcontroller. Using the timer/counter inside the microcontroller, the relevant time value can be measured, and then the phase angle can be calculated. The role of the optical transmitter and optical receiver is mainly to achieve measurement and complete two-way communication with the host.

Figure 1 Circuit principle block diagram of the measuring component
Principle of indirect measurement method
On the one hand, the host controls the measurement process and sends infrared light synchronization signals to each measuring component to start the measurement. On the other hand, after each component completes the measurement, the measurement data of each component is summarized to the host through infrared light communication, and then calculated to determine the measured parameters, that is, the indirect measurement method of introducing three-dimensional variables replaces the direct measurement method. This indirect measurement method no longer requires direct measurement of the time difference. It only needs to establish the time relationship between each parameter and the optical synchronization signal, and then calculate the time difference. The loop no longer needs to be connected on the circuit, and only one optical synchronization signal can indirectly measure the phase relationship between multiple measurement loop parameters.
The advantage of this method is that each measurement loop no longer needs to be connected to the reference point. The loops are relatively independent, and the time difference between the zero-crossing moment of each AC signal and the optical synchronization signal is measured respectively as the basic parameter of phase measurement. The association between them is not based on the connection in the form of circuit, but on the optical signal, so that the short circuit between the loops can be eliminated. In addition, the connection of the instrument can be reduced. In addition to being a synchronization signal, the optical signal is also used as a data transmission channel. Each measurement loop transmits the measurement data through light transmission and concentrates it in the host part to finally complete the numerical display of the parameter.
The working process
starts at a measurement cycle. The host controls the optical transmitter to send a synchronous infrared light signal. The optical receivers of the measurement components can receive this signal at the same time. The single-chip computers of each measurement component will start their own measurement process at the same time. After completing the measurement process, the single-chip computers of each component will transmit the measurement data back to the host in turn. The host single-chip computer receives the data of each measurement component in turn through the optical receiving head and summarizes these basic data. Finally, after calculation, the host displays the corresponding digital value, thus completing a measurement cycle. In the first stage
of the host part
, the host optical transmitter sends out a synchronous optical signal to start each measuring component and enter the measurement state at the same time. At this time, the P3.4/T0 pin of the single-chip computer is set to the output state. When working, a modulation signal will be generated, which will drive the photoelectric transmitter through the inverter 74LS04. According to the program agreement, this signal is an optical signal indicating "start", that is, the synchronization signal for starting measurement is transmitted to each measuring component through this optical signal.
In the second stage, each measuring component enters the measurement at the same time. After the measurement is completed, each component transmits the measurement data back to the host in turn. The host measures and recognizes the pulse of the P3.3/INT1 pin, and determines the signal sent by the measuring component through decoding, completing the work of "retrieving data". [page] The circuit structure of each measuring component in
the measurement part
is shown in Figure 1, in which the part mainly composed of UA1 (OP07) is a signal amplifier. For example, when the clamp current is used as the measurement of the current signal, the input electrical signal is generally small and must be amplified. The part mainly composed of UA2 (LM331) is the zero-crossing comparison circuit, which is mainly used to convert the signal into a square wave with zero-crossing changes. The rising edge of this square wave indicates the zero-crossing point of the AC signal. Figure 1 also includes the photocoupler SA1 (TIL117), which isolates the circuit on the one hand, and converts the square wave signal into a TTL level for measurement on the P3.2 (INT0) of the microcontroller. This pin is set to the input state, and the rising (or falling) edge of the square wave signal can be easily measured using software. Compared with the existing circuit, its measurement part is much simpler. The traditional circuit processes the AC signals of the two loops - that is, the zero-crossing points of the two signals are directly compared in one device to determine the phase difference (Δtx). However, this circuit is no longer based on direct comparison between the two signals, and the measurement method has also changed greatly. It uses a common optical pulse as the measurement synchronization signal.
After the measurement is completed, the P3.4/T0 pin of the microcontroller of the measuring component outputs the switch signal, which drives the photoelectric transmitter through the inverter 74LS04, and then transmits the measurement data of each measuring component to the host through the optical signal. Since each measuring component is numbered, the working procedures of each measuring component will send data to the host in sequence according to its own serial number. The
working timing
diagram 2 describes the timing relationship of data communication. When the optical receiver output signal has a falling edge (i.e. Ps=0), it means that the signal from the host is received. The timing starts when the rising edge arrives, and the subsequent data transmission is also based on this rising edge as a reference standard. The measurement time Txi +T0i and Txj+T0j are not greater than 40ms. For the first measuring component, after the synchronization signal starts the measurement, the data can be transmitted after a delay of TM1≥Txi +T0i. For reliability, this design takes TM1=50ms as the delay time of the measurement process. Assuming that the time for each data transmission is TN, the delay of the second measuring component to transmit data is the first delay time plus TN, that is: TM2= TM1+TN, and the calculation of the subsequent delay TM is similar.
According to this process, the host will save the measurement data of each part in its internal storage area in sequence for subsequent calculation and display.

Figure 2 Timing relationship of data communication
Conclusion
This indirect measurement method is an improvement on the traditional measurement method. The optical signal is introduced into the measurement process as a reference, and the final parameter data is obtained by relying on the computer's control, storage, calculation and processing functions. Since this method relies on optical signals as synchronization and data transmission, multiple measurement loops no longer need to be directly connected in the circuit, but are carried out independently, which is very useful for solving practical problems.
Previous article:Application of Multi-function Oscilloscope in Frequency Converter Analysis and Measurement
Next article:Simulation Analysis and Design of Signal Integrity and Power Integrity
- Popular Resources
- Popular amplifiers
Recommended Content
Latest Test Measurement Articles
- From probes to power supplies, Tektronix is leading the way in comprehensive innovation in power electronics testing
- Seizing the Opportunities in the Chinese Application Market: NI's Challenges and Answers
- Tektronix Launches Breakthrough Power Measurement Tools to Accelerate Innovation as Global Electrification Accelerates
- Not all oscilloscopes are created equal: Why ADCs and low noise floor matter
- Enable TekHSI high-speed interface function to accelerate the remote transmission of waveform data
- How to measure the quality of soft start thyristor
- How to use a multimeter to judge whether a soft starter is good or bad
- What are the advantages and disadvantages of non-contact temperature sensors?
- In what situations are non-contact temperature sensors widely used?
MoreSelected Circuit Diagrams
MorePopular Articles
- LED chemical incompatibility test to see which chemicals LEDs can be used with
- Application of ARM9 hardware coprocessor on WinCE embedded motherboard
- What are the key points for selecting rotor flowmeter?
- LM317 high power charger circuit
- A brief analysis of Embest's application and development of embedded medical devices
- Single-phase RC protection circuit
- stm32 PVD programmable voltage monitor
- Introduction and measurement of edge trigger and level trigger of 51 single chip microcomputer
- Improved design of Linux system software shell protection technology
- What to do if the ABB robot protection device stops
MoreDaily News
- Analysis of the application of several common contact parts in high-voltage connectors of new energy vehicles
- Wiring harness durability test and contact voltage drop test method
- From probes to power supplies, Tektronix is leading the way in comprehensive innovation in power electronics testing
- From probes to power supplies, Tektronix is leading the way in comprehensive innovation in power electronics testing
- Sn-doped CuO nanostructure-based ethanol gas sensor for real-time drunk driving detection in vehicles
- Design considerations for automotive battery wiring harness
- Do you know all the various motors commonly used in automotive electronics?
- What are the functions of the Internet of Vehicles? What are the uses and benefits of the Internet of Vehicles?
- Power Inverter - A critical safety system for electric vehicles
- Analysis of the information security mechanism of AUTOSAR, the automotive embedded software framework
Guess you like
- Implementation Method of Software Serial Interface (SCI) Based on C2000
- Ultra-wideband positioning applications
- Share a book: Crazy STM32 practical lectures
- Design and implementation of Ethernet MII interface expansion based on FPGA
- [RISC-V MCU CH32V103 Review] Board Unboxing and Schematic Analysis
- Efficiency Programming of Single Chip Microcomputer Active Buzzer Driver
- The speed measurement scheme of motor compressor based on Labview
- ADI’s Big Benefit丨Collection of Uncommon Questions (Issue 141-170) is officially online!
- Learning Python from scratch, any good suggestions or learning methods?
- 【Renovation of old things】 Graffiti lamp 2 software preparation

 TP3554IVA


 京公网安备 11010802033920号