1. Introduction
The development environment is Ubuntu server 18.04. The nand used in the information I found is 64M, and the board I have is 256M, so the image bin file in the information cannot be used directly. There will be an ecc problem, because he uses yaffs on the 64M nand and can only use yaffs2 on the 256M nand. Due to my insufficient level, in fact, I am just lazy, so I don’t want to modify the relevant code and choose to start the root file system from nfs. After all, it is convenient to port drivers or write applications in the future and directly use nfs to mount. After several days of tossing, I finally filled in all the holes and successfully started to the shell, but self-study still takes too many detours.
2. Network environment configuration
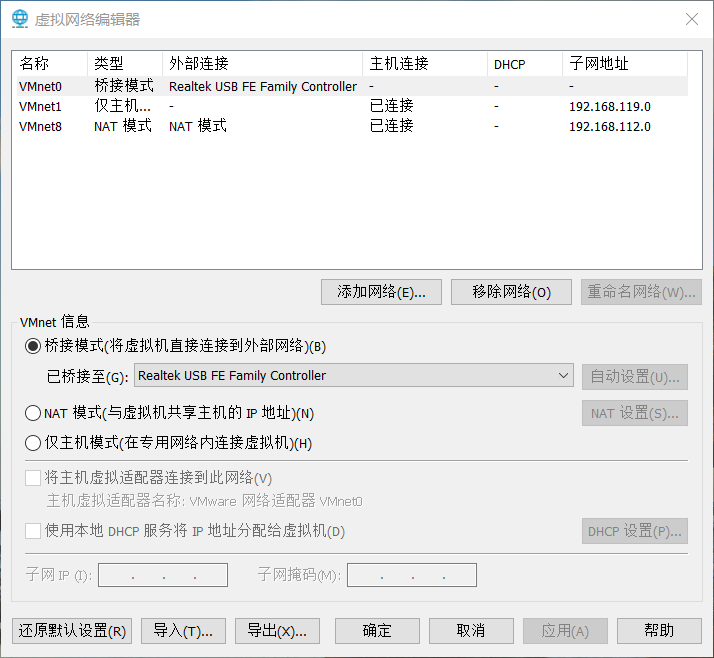
To start the development board from nfs, you must first establish a network connection between the virtual machine and the development board. Because my virtual machine is connected to the external network through vmnet8, I choose to bridge vmnet0 to the USB network card to connect to the development board.
Run the virtual network editor as an administrator and configure vmnet0 as follows:

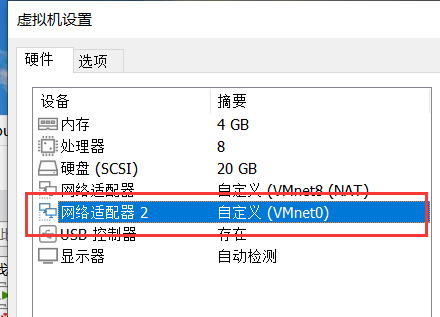
Then add a network card to the virtual machine and specify the connection to vmnet0:

Enter the virtual machine and assign an address to the virtual network card:
sudo vim /etc/netplan/00-installer-config.yaml #The specific file name varies for different virtual machines, just complete it in tab
My configuration is as follows:
network:
version: 2
bonds: {}
bridges: {}
ethernets:
ens33:
addresses:
- 192.168.112.3/24
dhcp4: false
dhcp6: false
gateway4: 192.168.112.2
nameservers:
addresses:
- 192.168.112.2
ens35:
addresses:
- 192.168.8.3/24
dhcp4: false
dhcp6: false
routes:
- to: 192.168.8.0/24
via: 192.168.8.2
vlans: {}
wifi: {}
Set the gateway and other parameters according to the ip summarized above. ens35 is vmnet0, which is bridged to the USB network card. Be careful not to use gateway4 to configure the gateway, otherwise a double default gateway will be generated when the machine is turned on, and there will be problems connecting the virtual machine to the external network.
If there is no ens35, you can use ifconfig -a to check first and then use ( ifconfig network card name up ) to enable the corresponding network card.
route -n
Use the above command to view the routing table as follows:
streleizia@ubuntu:~$ route -n
Kernel IP routing table
Destination Gateway Genmask Flags Metric Ref Use Iface
0.0.0.0 192.168.112.2 0.0.0.0 AND 0 0 0 ens33
192.168.8.0 0.0.0.0 255.255.255.0 U 0 0 0 ens35
192.168.8.0 192.168.8.2 255.255.255.0 AND 0 0 0 ens35
192.168.112.0 0.0.0.0 255.255.255.0 U 0 0 0 ens33
streleizia@ubuntu:~$
You can see that there is only one default route (destination is 0.0.0.0) whose gateway is the external network card (192.168.112.2). In this way, traffic accessing the external network will not be mistakenly sent to the internal network gateway.
In addition, dual network cards may cause network problems on the host (Windows). You can view the host routing table (enter route print in cmd to view it) and then delete the route pointing to the USB network card, and configure the default route of the external network card as follows:
IPv4 routing table
===========================================================================
Active Routing:
Network Destination Netmask Gateway Interface Metric
0.0.0.0 0.0.0.0 192.168.1.1 192.168.1.107 35
127.0.0.0 255.0.0.0 On link 127.0.0.1 331
127.0.0.1 255.255.255.255 On link 127.0.0.1 331
127.255.255.255 255.255.255.255 on link 127.0.0.1 331
192.168.1.0 255.255.255.0 on link 192.168.1.107 291
192.168.1.107 255.255.255.255 On link 192.168.1.107 291
192.168.1.255 255.255.255.255 on link 192.168.1.107 291
192.168.112.0 255.255.255.0 on link 192.168.112.1 291
192.168.112.1 255.255.255.255 On link 192.168.112.1 291
192.168.112.255 255.255.255.255 on link 192.168.112.1 291
224.0.0.0 240.0.0.0 on link 127.0.0.1 331
224.0.0.0 240.0.0.0 on link 192.168.112.1 291
224.0.0.0 240.0.0.0 on link 192.168.1.107 291
255.255.255.255 255.255.255.255 on link 127.0.0.1 331
255.255.255.255 255.255.255.255 on link 192.168.112.1 291
255.255.255.255 255.255.255.255 on link 192.168.1.107 291
===========================================================================
Permanent Routing:
Network AddressNetwork MaskGateway AddressMetrics
0.0.0.0 0.0.0.0 192.168.1.1 1
===========================================================================
192.168.1.1 is the address of the home router
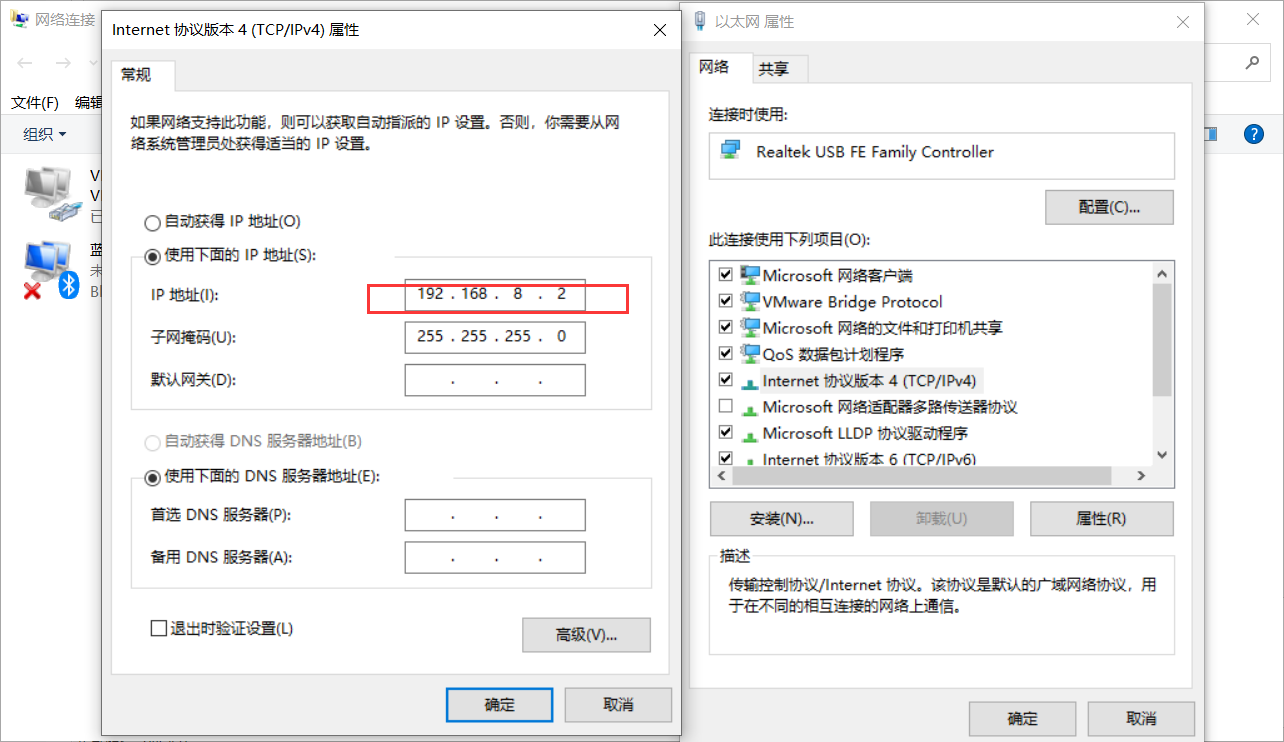
Finally, make sure to configure the host's USB network card to the same network segment as the virtual machine, as shown in the figure:

Summarize:
The USB network card IP is manually configured to: 192.168.8.2
The virtual machine IP is manually configured as: 192.168.8.3 The gateway is 192.168.8.2
The development board IP is manually configured as: 192.168.8.100 The gateway is 192.168.8.2 (will be configured later)
Ping each other. If the ping is successful, it is considered successful. If there is no response when pinging the Windows host, it is because the host firewall is not turned off (it only affects ping, not the subsequent nfs and tftp transmission). In addition, the Linux virtual machine firewall may also be turned on, just turn it off.
3. Configure the software environment
The network is set up, and all that remains is to install various software. Use the following command to install the software package in Ubuntu:
sudo apt-get install tftpd tftp xinetd nfs-kernel-server vsftpd
Then configure them one by one:
First configure ftp:
sudo you /etc/vsftpd.conf
Remove the # sign before the following configuration
#local_enable=YES
#write_enable=YES
After saving, restart the service using the following command:
sudo /etc/init.d/vsftpd restart
Next, configure tftp:
First create a folder in a preferred location. I chose to create the nfs_root directory in the home directory. Don’t forget to add permissions for all users with sudo chmod 777 nfs_root -R
streleizia@ubuntu:~/nfs_root$ pwd
/home/streleizia/nfs_root #You can see the path: /home/streleizia/nfs_root
streleizia@ubuntu:~/nfs_root$ tree -d
.
├── fs_mini #busybox is installed in this folder
│ ├── bin
│ ├── dev
│ ├── etc
│ │ └── init.d
│ ├── lib
│ ├── mnt
│ ├── proc
│ ├── root
│ ├── sbin
│ ├── sys
│ ├── tmp
│ └── usr
│ ├── bin
│ └── sbin
└── fs_mini_mdev
├── bin
├── dev
├── etc
│ └── init.d
├── lib
├── mnt
├── proc
├── root
├── sbin
├── sys
├── tmp
└── usr
├── bin
└── sbin
30 directories
streleizia@ubuntu:~/nfs_root$
sudo you /etc/xinetd.d/tftp
After opening the configuration file, enter the following:
service tftp
{
socket_type =dgram
protocol =udp
wait =yes
user =root
server =/usr/sbin/in.tftpd
server_args =-s /home/streleizia/tftp_root #Note that the path here is consistent with the one created above
disable =no
per_source =11
cps =100 2
flags =IPv4
}
sudo /etc/init.d/xinetd restart
Restart the service and it will be ok if there is no error.
sudo vi /etc/exports
Finally configure nfs:
Open the nfs configuration file and add the following configuration:
# /etc/exports: the access control list for filesystems which may be exported
# to NFS clients. See exports(5).
#
# Example for NFSv2 and NFSv3:
# /srv/homes hostname1(rw,sync,no_subtree_check) hostname2(ro,sync,no_subtree_check)
#
# Example for NFSv4:
# /srv/nfs4 gss/krb5i(rw,sync,fsid=0,crossmnt,no_subtree_check)
# /srv/nfs4/homes gss/krb5i(rw,sync,no_subtree_check)
/home/streleizia/workspace/yaffs2_tool/nfs_root *(rw,sync,no_root_squash) #Here I created three nfs directories, which are root file systems built in different ways.
/home/streleizia/nfs_root/fs_mini *(rw,sync,no_root_squash) #Note that it is consistent with the directory path created above
/home/streleizia/nfs_root/fs_mini_mdev *(rw,sync,no_root_squash)
sudo /etc/init.d/nfs-kernel-server restart
Restart the service and it will be ok if there is no error.
Here comes the point. The nfs version automatically installed by Ubuntu 18.04 is too high and does not match the 2.6.22 kernel version, which causes nfs to fail to mount and the kernel is stuck at:
VFS: Unable to mount root fs via NFS, trying floppy
Solution reference article:
https://blog.csdn.net/Qiuoooooo/article/details/112601940
That is: add RPCNFSDOPTS="--nfs-version 2,3,4 --debug --syslog" in /etc/default/nfs-kernel-server and restart NFS
4. Test nfs
Use tftp to burn the kernel image with uboot. The detailed method will not be repeated here. Pay attention to using the matching root file system and kernel image. It is best to be able to start normally on nand. Set the startup parameters in uboot as follows:
bootargs=noinitrd root=/dev/nfs nfsroot=192.168.8.3:/home/streleizia/nfs_root/fs_mini ip=192.168.8.100:192.168.8.3:192.168.8.2:255.255.255.0:linux:eth0:off init=/linuxrc console=ttySAC0
The boot kernel outputs information and successfully boots into the busybox command line!
drivers/hid/usbhid/hid-core.c: v2.6:USB HID core driver
TCP cubic registered
NET: Registered protocol family 1
s3c2440-sdi s3c2440-sdi: CMD[TIMEOUT] #5 op:APP_CMD(55) arg:0x00000000 flags:0x0875 retries:0 Status:nothing to complete
s3c2440-sdi s3c2440-sdi: CMD[TIMEOUT] #6 op:APP_CMD(55) arg:0x00000000 flags:0x0875 retries:0 Status:nothing to complete
Previous article:Porting FreeRTOS on S3C2440
Next article:Understanding of link address and runtime address
- Popular Resources
- Popular amplifiers
 Professor at Beihang University, dedicated to promoting microcontrollers and embedded systems for over 20 years.
- Innolux's intelligent steer-by-wire solution makes cars smarter and safer
- 8051 MCU - Parity Check
- How to efficiently balance the sensitivity of tactile sensing interfaces
- What should I do if the servo motor shakes? What causes the servo motor to shake quickly?
- 【Brushless Motor】Analysis of three-phase BLDC motor and sharing of two popular development boards
- Midea Industrial Technology's subsidiaries Clou Electronics and Hekang New Energy jointly appeared at the Munich Battery Energy Storage Exhibition and Solar Energy Exhibition
- Guoxin Sichen | Application of ferroelectric memory PB85RS2MC in power battery management, with a capacity of 2M
- Analysis of common faults of frequency converter
- In a head-on competition with Qualcomm, what kind of cockpit products has Intel come up with?
- Dalian Rongke's all-vanadium liquid flow battery energy storage equipment industrialization project has entered the sprint stage before production
- Allegro MicroSystems Introduces Advanced Magnetic and Inductive Position Sensing Solutions at Electronica 2024
- Car key in the left hand, liveness detection radar in the right hand, UWB is imperative for cars!
- After a decade of rapid development, domestic CIS has entered the market
- Aegis Dagger Battery + Thor EM-i Super Hybrid, Geely New Energy has thrown out two "king bombs"
- A brief discussion on functional safety - fault, error, and failure
- In the smart car 2.0 cycle, these core industry chains are facing major opportunities!
- The United States and Japan are developing new batteries. CATL faces challenges? How should China's new energy battery industry respond?
- Murata launches high-precision 6-axis inertial sensor for automobiles
- Ford patents pre-charge alarm to help save costs and respond to emergencies
- New real-time microcontroller system from Texas Instruments enables smarter processing in automotive and industrial applications
- Capacitor three-point oscillation composed of operational amplifier
- 09 ADC acquisition and power management system (series post)
- 【Short-term weather forecast system】Scheme planning
- Power supply topology
- Application of circular queue
- 關於C2000 使用SCI在線升級做法求解
- 【GD32450I-EVAL】Preliminary Study on TLI-RGB Screen Driver
- An easy-to-understand tutorial on the msp430 microcontroller
- [TI recommended course] #PFC power supply design and inductor design calculation#
- [Distributed temperature and humidity acquisition system] + STM32H745I-LWIP program


 Exploring the Linux kernel based on Loongson
 SMBus Quick Start Guide


 京公网安备 11010802033920号