This post was last edited by nich20xx on 2020-5-31 17:16
1 Overview
This article mainly describes the temperature and humidity sensor HDC1000 software package based on the RT-Thread Sensor framework, and records in detail the production process of the RT-Thread sensor software package.
The main contents of this article are as follows:
- Basic knowledge of low power temperature and humidity sensor HDC1000
- HDC1000 software package functional design
- HDC1000 Software Package Functional Overview
- Use and test of HDC1000 software package
- HDC1000 software package production and release
- Make a package index
- Local testing of packages
- PR push
HDC1000 software package code repository:
https://github.com/Forest-Rain/hdc1000
2 HDC1000 Application Principle
2.1 Working Principle of HDC1000 Sensor

Figure 2.1 HDC1000 functional block diagram
The HDC1000 is an integrated humidity and temperature sensor developed by TI that provides excellent measurement accuracy at low power consumption. The sensing element of the HDC1000 is located at the bottom of the device, which helps the HDC1000 to be protected from dust, dirt and other environmental pollutants, making it more stable and reliable.
HDC1000 interacts with Host MCU as an IIC slave device through the IIC interface.
HDC1000 has a built-in heating element (Heater), which can be turned on briefly by software to dissipate condensation and moisture generated by long-term exposure of the device to a high humidity environment, thereby increasing the reliability of the humidity sensor. In addition, the heating function can also be used to verify the function of the integrated temperature sensor.
Note: It is recommended to use the new generation product HDC2010 instead of HDC1000 . HDC2010 has better features and functions, but the hardware and software interfaces of the two are incompatible.

Table 2.1 Main functions and features of HDC1000
|
Characteristics parameters
|
illustrate
|
|
Operating temperature range
|
-40°C to 125°C
|
|
Temperature accuracy
|
±0.2°C |
|
Operating relative humidity (RH)
|
0% to 100%
|
| Relative humidity accuracy |
±3%
|
|
Measurement resolution
|
Temperature: 11, 14
Humidity: 8, 11, 14
|
|
Encapsulation
|
DSBGA (8 bumps)
2.04mm x 1.59mm
|
| Sleep current |
200nA
|
|
Average supply current (measured 1 time per second)
|
RH only (11 digits)
|
820nA
|
|
RH (11 bits) + Temperature (11 bits)
|
1.2A
|
| Supply voltage |
3V to 5V
|
| User Interface
|
IIC
|
|
Number of registers
|
8 (each register is 16 bits)
|
2.1.1 Working Mode
HDC1000 has two working modes: Sleep Mode and Measurement Mode.
- Sleep Mode
- After power-on, the sensor is in sleep mode by default. The host MCU sends instructions through the IIC interface to wake up the sensor and perform read and write operations on the sensor. After completing a valid temperature/humidity measurement, HDC1000 automatically returns to sleep mode.
- Test Mode
- The HDC1000 measurement mode only supports (manual) trigger on demand (Trigger on Demand). (HDC2010 supports automatic timing sampling mode)
2.1.2 Typical Application Scenarios
- IoT low power applications, such as
- Smart thermostat
- Smart Home Assistant
- Cold Chain Transport
- Wearable devices
- Smart refrigerator
- Smoke and heat detectors
- Environmental labels ...
2.2 Hardware Design

Figure 2.2 Typical application circuit of HDC1000
HDC1000 has 2 address lines. Therefore, up to 4 HDC1000s can be mounted on one IIC bus.
|
Device Model
|
ADR1
|
ADR0
|
Address description (7-bit address)
|
|
HDC1000
|
0
|
0
|
100 0000
|
|
0
|
1
|
100 0001
|
|
1
|
0
|
100 0010
|
|
1
|
1
|
100 0011
|
2.3 Software Design
The acquisition of temperature and humidity data of HDC1000 is mainly completed by MCU reading and writing the specified registers through the IIC interface. The specific implementation process mainly includes the following contents:
- IIC communication driver
- Use the simulated I2C driver provided by the RT-Thread system to access the HDC1000 sensor. You can view the env tool --> menuconfig --> RT-Thread Components --> Device Drivers -->
- Sampling conversion completion judgment. Sampling completion can be determined in two ways according to the actual situation:
-
- HDC1000 provides a DRDY/INT hardware pin to indicate that the temperature\humidity sampling conversion is completed. This pin can be used to wake up the Host MCU.
- If the actual application circuit does not use this pin, a fixed delay method can be used to wait for the sensor conversion to complete. The sampling conversion time is as follows:
 Figure 2.3 Temperature and humidity sampling conversion time
- Single sampling (trigger on demand), here the default is the sequential sampling method (that is, each sampling, the temperature and humidity sampling are performed one by one)

Figure 2.4 Single sampling process
2.3.1 IIC slave address
From the circuit diagram in Figure 2.2 (ADR0 = 0, ADR1 = 0), we can see that the current IIC slave address of the HDC1000 sensor is 0x40.
Note: If the STM32 hardware IIC driver is used, the slave address passed to HAL_I2C_Init() is 0x80 (8-bit address format)
/* according to hdc1000 spec */
// ADR0 = 0,ADR1 = 0 ==> hdc1000 slave address 0x40(7-bit address)
#define HDC1000_DEVICE_IIC_BUS_ADDRESS 0x40
2.3.2 IIC Timing
The main IIC timing of HDC1000 includes reading and writing configuration register (Configuration Register (0x02)), trigger sampling (rigger Humidity/Temperature Measurement (0x00\0x01)), and reading temperature (Read Humidity/Temperature Measurement).
The IIC timing for reading temperature and humidity is as follows:

Figure 2.5 IIC timing for reading temperature and humidity (sequential sampling method)
The IIC timing example for reading temperature and humidity values is shown below

Figure 2.6 IIC example of reading temperature and humidity (sequential sampling method)
Special attention:
The HDC1000 temperature and humidity registers are 16 bits, with the high bit first (big-endian mode), so the read-back values need to be converted to little-endian mode.
The code for processing the read-back register data is as follows:
        if (rt_i2c_transfer((struct rt_i2c_bus_device *)dev->bus, msgs, 1) == 1)
        {
            res = RT_EOK;

            *temp_raw = (buffer[0] << 8) | buffer[1];
            *humi_raw = (buffer[2] << 8) | buffer[3];
        }
        else
        {
            res = -RT_ERROR;
        }
2.3.3 Temperature and humidity value conversion

Figure 2.7 Temperature and humidity result conversion formula
According to the formula in Figure 2.7, convert the obtained temperature\humidity register values into actual temperature (℃) and humidity (%RH).
3 HDC1000 Software Package Functional Design
3.1 HDC1000 Software Package Function Introduction
The HDC1000 software package supports the rapid collection of temperature and humidity data.
|
Function Item\Included Equipment
|
thermometer |
Hygrometer |
| Communication interface |
|
|
| IIC |
√ |
√ |
| Working Mode |
|
|
| polling |
√ |
√ |
| Interrupt |
|
|
| Power Mode |
|
|
| Power off |
|
|
| Low power consumption |
√ |
√ |
| Measuring range |
|
|
| Self-Test |
√
|
√
|
| Multiple instances |
|
|
3.2 HDC1000 software package function implementation
3.2.1 HDC1000 software package dependencies
- RT-Thread 4.0.0+
- Sensor Components
- IIC driver: HDC1000 devices use IIC for data communication and require the support of the RT-Thread system IIC driver framework;
3.2.2 Main implementation files of HDC1000 software package

Note: For the writing of Sconscript, please refer to the official Scons build tool documentation of RT-Thread: https://www.rt-thread.org/document/site/programming-manual/scons/scons/
3.3 Use of HDC1000 Software Package
The HDC1000 software package can be used in two ways: Finsh/Msh command window and application calling.
3.3.1 Finsh/Msh Command Window
You can use and test the HDC1000 software package by entering the following commands through the RT-Thread CLI tool Finsh/msh:
- list_device, check whether the corresponding device is registered successfully

- sensor, view the Finsh/msh commands currently supported by the sensor driver framework

Note: rt_kprintf does not support floating point numbers and special characters.
- sensor info, view the specific information (measurement range, etc.) of the sensor device currently mounted by the sensor driver framework.

4.sensor probe XXX, check whether the current sensor device is available.
- The XXX parameter is the registered sensor device name, that is, the *name parameter passed in when calling rt_hw_hdc1000_init(const char *name, struct rt_sensor_config *cfg)
-
- Eg: In this example, call rt_hw_hdc1000_init("hdc1000", &cfg) to register the device
- The sensor driver framework will automatically add a prefix to the incoming *name
-
- Sensors of this
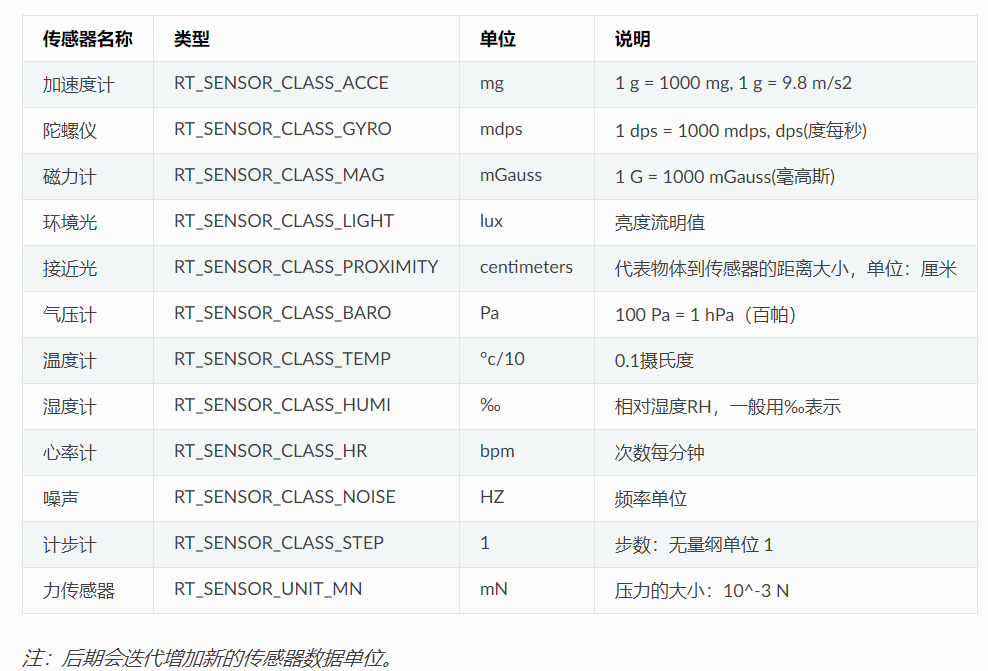
加速度计type are automatically acce_prefixed with .
- Since the system default device name is up to 7 characters long, if the name passed in exceeds 3 characters, it will be truncated.

Figure sensor driver framework automatically adds prefix character table
Enter sensor probe temp_hdc1000 through msh, and you can see the following return content:

- sensor read YYY, read the sensor value. YYY is the number of readings.

- Switch to the humidity sensor device through sensor probe humi_hdc1000, and then read it through sensor read 5.

- Enter hdc1000_selftest, which is a quick self-test program provided by the hdc1000 software package.

3.3.2 Application Call
- In the application, after registering the device normally (rt_hw_hdc1000_init("hdc1000", &cfg)),
- Access the sensor device through the API (rt_device_find\rt_device_open\rt_device_read, etc.) provided by the device (rt_device) framework.
For details, please refer to the sensor_ti_hdc1000_example.c example code
int rt_hw_hdc1000_port(void)
{
    struct rt_sensor_config cfg;
    rt_int8_t result;
    cfg.intf.dev_name = "i2c1";
    cfg.intf.user_data = (void *)HDC1000_SLAVE_ADDR_DEFAULT;
    cfg.irq_pin.pin = RT_PIN_NONE;

    result = rt_hw_hdc1000_init("hdc1000", &cfg);
    return result;
}
INIT_APP_EXPORT(rt_hw_hdc1000_port);

void application_get_sensor_val(void)
{
    struct rt_sensor_data sensor_data;
    rt_size_t res;
    rt_device_t dev = RT_NULL;

    dev = rt_device_find("temp_hdc1000");
    if (rt_device_open(dev, RT_DEVICE_FLAG_RDWR) != RT_EOK)
    {
      LOG_E("open device failed!");
      return;
    }
    res = rt_device_read(dev, 0, &sensor_data, 1);
    if (res != 1)
    {
      LOG_E("read data failed!size is %d", res);
    }
    else
    {
      LOG_I("temp:%3d.%dC, timestamp:%5d", sensor_data.data.temp / 10, sensor_data.data.temp % 10, sensor_data.timestamp);
      LOG_I("humi:%3d.%dC, timestamp:%5d", sensor_data.data.humi / 10, sensor_data.data.humi % 10, sensor_data.timestamp);
    }
    rt_device_close(dev);
}
Note 1:
- Closing the device interface (rt_device_open) and opening the device interface (rt_device_close) must be used in pairs. Each time a device is opened, it must be closed once. Only in this way can the device be completely closed. Otherwise, the device is still in an unclosed state.
Note 2:
- In the sensor driver framework, in the fetch_data interface, the temperature and humidity values are expanded by 10 times. For details, see the units of different sensor types in the Sensor driver framework.

4 RT-Thread HDC1000 software package index creation and release
After completing the main functions of the HDC1000 software package, the next step is to create and publish the RT-Thread software package index.
RT-Thread adopts a package management method similar to that of high-level languages (such as Python), innovatively introducing software packages into open source RTOS, which is a dynamic form of community management.
Note: For the production of software packages, please refer to the "Software Package Development Guide" in the official RT-Thread document https://www.rt-thread.org/document/site/development-guide/package/package/
The production of the HDC1000 software package based on RT-Thread mainly involves two major links:
-
- HDC1000 software package source code file (Chapter 3 of this article)
- HDC1000 Software Package Index (Package Information)

4.1 Create a git code repository
4.1.1 Use tools
-
- git distributed version management tool
-
-
- In Windows, Git tool provides two operation modes: Git GUI or Git Bash
-
-
- Here we choose the most widely used github
4.1.2 Create a local git repository
- Create a local repository
-
- If you use Git Bash, open the Git Bash command line window, enter cd /d xxx to switch to the specified folder (such as the software package code folder in Chapter 3) (/d is the role of Windows to switch drive letters), and then execute git init;
- If you use Git GUI, right-click in the specified folder -> select "Git GUI Here" in the pop-up window -> a new window will pop up -> "Create New Repository"
- Configure user information for the git repository.
git config user.name "your own github username"
git config user.name "your own github registered email"
After configuration, you can check whether it is effective through git config --list
- For files that do not need to be included in version management, you can set the filter file .gitignore.
build # Filter the entire folder contents of bulid
Debug # Filter the entire Debug folder content
documentation/html # Filter all contents of the documentation/html folder
*~ # Filter all files ending with ~
*.o # Filter all files ending with .o
*.uvguix* # Filter all files containing .uvguix
- At this point, you can perform version management of code files locally.
4.1.3 Create a developer's git remote repository
- Establish a repository for the software package. Developers can create it on remote repository platforms (git servers) such as github and gitee, and upload the software package code.
The following is the hdc1000 code repository created on GitHub

- Click “Create repository”, and you will get the address of a remote repository: git@github.com:Forest-Rain/hdc1000.git.
- Configure SSH keys in Github
- Generate rsa key locally
- Switch to the local project folder through the Git Bash command window, enter ssh-keygen -t rsa in the Bash window, and then follow the prompts.
- Log in to the "account settings" of the GitHub website, click "Setting -> SSH and GPG Keys"->"New SSH key", and fill in the local RSA key (the string in id_rsa.pub).
- Establish the association between the git remote repository and the local repository.
git remote add [remote warehouse alias] [remote warehouse address]
Note:
Set origin as the alias of [remote warehouse address]. You can use origin directly to access the remote warehouse later. [Remote warehouse alias] can be customized arbitrarily.
For example: After creating a hdc1000 repository on the GitHub web page, enter the following command in the local Git Bash
git remote add origin git@github.com:Forest-Rain/hdc1000.git
4. The association is established. You can use git remote -v to check whether it is established successfully.
- At this point, you can synchronize the local warehouse to the remote warehouse.
git add .
git commit "V1.0 update information"
4.2 Create HDC1000 software package index
4.2.1 Using Tools (RT-Thread Env)
- RT-Thread's Env tool provides us with a wizard function to automatically generate a software package index (file).
4.2.2 Steps to generate a package index
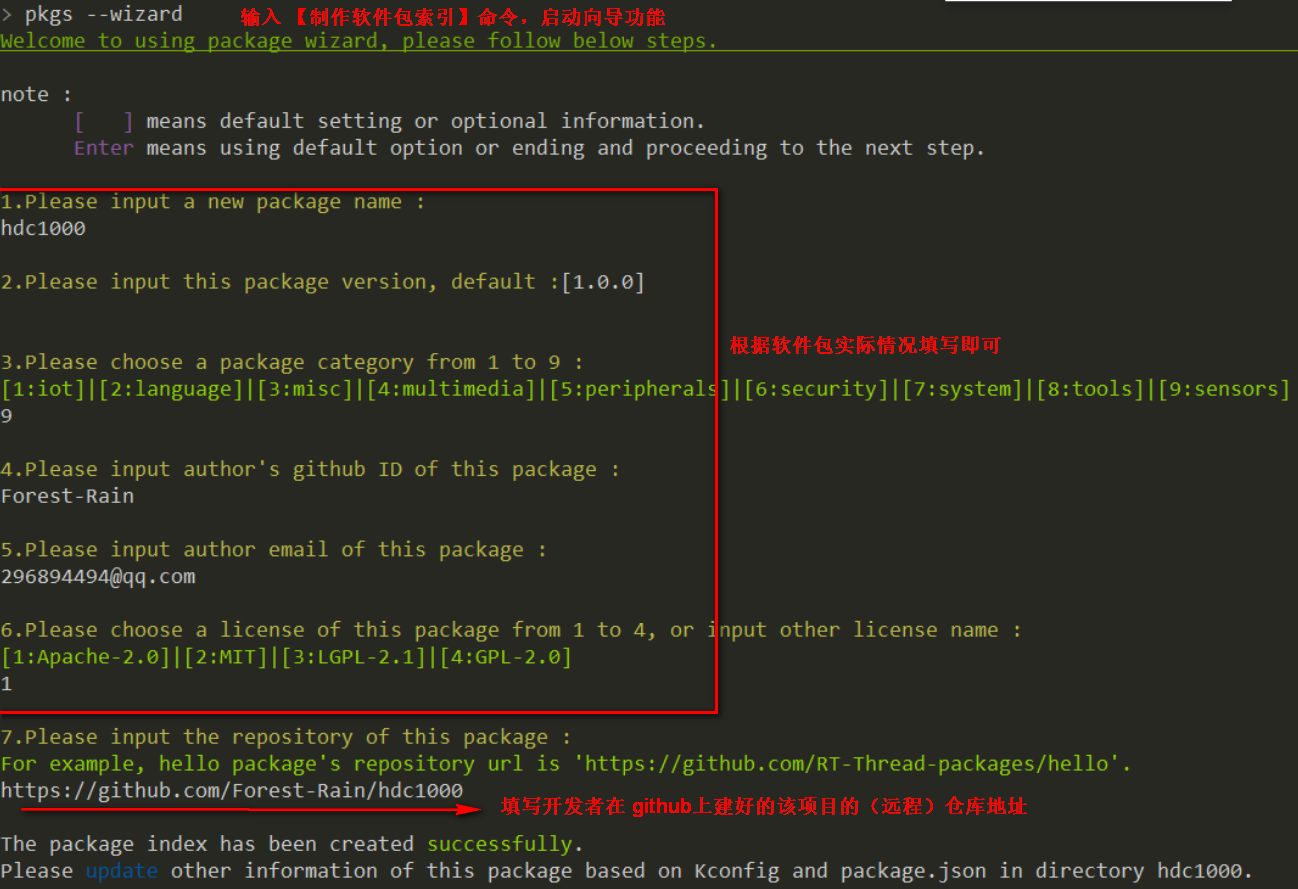
- Enter pkgs --wizard in Env to enter the wizard function
- Follow the prompts to fill in the relevant information of the software package (Package name, version number, category, author, license, Git repository, etc.)

Figure 4.1 HDC1000 software package index
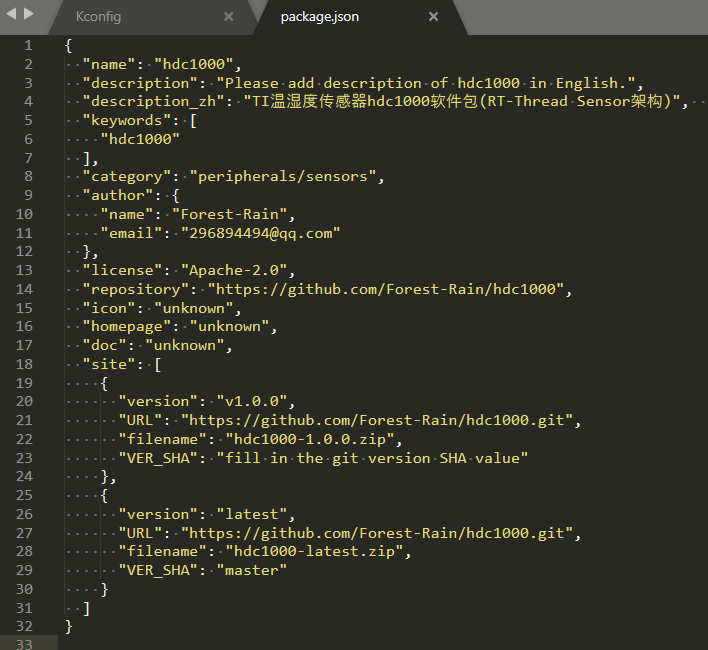
- After executing step 2, a folder named hdc1000 will be automatically generated in the current file path where you open ConEmu, which contains two files:
4.3 Modify the HDC1000 software package index
The software package index file generated in "4.1" has been further modified and improved.

4.4 Local test package index
- Copy the software package index file hdc1000 to the corresponding category directory of the env tool package, here is the \packages\peripherals\sensors directory

- Modify the Kconfig file in the \packages\peripherals\sensors directory and manually add the HDC1000 software package source information

- After completing the above steps correctly, you can see the HDC1000 software package in env -> menucofig -> RT-Thread online packages -> peripheral libraries and drivers -> sensor drivers
-
- Test whether the software package download is OK
- Then test whether the package function is compiled OK, whether the function is OK, etc.

4. After the local test is completed, submit or update the package source code to the developer's own github repository (such as https://github.com/Forest-Rain/packages in this article ) through git push
4.5 Submitting Package Index
- If you have not used the RT-Thread software package index repository ( https://github.com/RT-Thread/packages ) before, first fork the repository to the developer's own github repository, and then git clone the newly forked repository locally.
- Add the hdc1000 software package and Kconfig to the directory specified by packages, and then git push it to submit

- Log in to the github page of the developer's forked package repository (such as https://github.com/Forest-Rain/packages in this article ), find the Pull Request prompt you submitted, fill in the necessary description information, and then submit the PR to the official package index repository of RT-Thread ( https://github.com/RT-Thread/packages ).
- After waiting for RT-Thread's official PR to review and merge the code, other users can use the local env tool to
pkgs --updatepull the newly submitted package index and automatically synchronize the content displayed in the env tool menuconfig.
5 References
- TI HDC1000 official data entry
- TI HDC2010 official data entry
- Introduction to the sensor driver framework
-
- RT-Thread official software package index repository
- RT-Thread official software package code repository


 Room 1530, Zhongguancun MOOC Times Building,
Block B, 18 Zhongguancun Street, Haidian District,
Beijing 100190, China
Tel:(010)82350740
Postcode:100190
 京公网安备 11010802033920号


 提升卡
提升卡 变色卡
变色卡 千斤顶
千斤顶